Ubuntu / Linux news and application reviews.

Snackr Displays and Scrolls RSS Feeds on Your Desktop

photobucketphotobucket


Snackr is an RSS ticker that pulls random items from your feeds and scrolls them across your desktop. When you see a title that looks interesting, you can click on it to pop up the item in a window (Windows / Linux / Mac).

Snackr was built using Adobe Flex 3 and Adobe AIR 1.0. AIR makes it really easy to build cross-platform desktop apps using web technologies like AJAX, Flash and Flex. The Adobe AIR runtime will be installed when you install Snackr.

To install Snackr, first you need to install Adobe Air, then download Snackr, double click the file you just downloaded and follow the on-screen instructions.

[via 7-11]

How to Install and Configure Conky-Colors Plus (Light-weight System Monitor for X) [Linux]

conky colors plus

Conky is a free, light-weight system monitor for X, that displays any information on your desktop but it's quite difficult especially for beginners to set up.

CONKY-colors Plus is an easier way to configure Conky: it automatically generates a .conkyrc file with different themes, calendar, some useful scripts such as weather, Rhythmbox, it supports multiple languages: English, Spanish, Italian, Polish, German and Portuguese and so on.


Here is how to use CONKY-colors Plus:


1.
sudo apt-get install conky python-statgrab

2. Download and extract the conky-colors.tar.gz, use the terminal to navigate to it's directory and type this in terminal:
make

3. To see the options (the way you want to configure conky):
./conky-colors --help

4. And after you decide on what options to use, type this (replace (options) with the desired options):
./conky-colors (options)
make install

For instance, I choosed these options:
./conky-colors -l en -c proton -cpu 2 --updates --calendar -m --hd --network --ubuntu

Which mean: English language, proton theme, 2 cpu's, show available updates, calendar for which the week starts on Monday, hard disks, network and the ubuntu logo.
Like I said, use the ./conky-colors --help command to see the available options.

5. Now you need to update the font cache:
fc-cache -v -f

6. Attention: In the conky-colors.tar.gz archive there is a hidden .scripts folder where you will find some scripts you can use. For the weather forecast there is a deb file and all you have to do is install it.

To find out how to configure those scripts, see here:

Conky Weather Script: http://ubuntuforums.org/showthread.php?t=869328
Conky SSL Mail Script: http://ubuntuforums.org/showthread.php?t=869771
Conky Rhythmbox Script: http://ubuntuforums.org/showthread.php?t=928168&highlight=conky+rhythmbox
Conky Pidgin Script: httpp://ubuntuforums.org/showthread.php?t=969933&highlight=pidgin+conky

If you choose --update apt-get option, open ~/.scripts/updates_monitor and read the instructions (debian/ubuntu users only).

If you choose --todo, create a file called ToDo.txt in your home and open ~/scripts/task file to install this script. It helps you to easy add and remove tasks.

7. To run conky, press Alt + F2 and type:
conky

8. To run conky at startup, you have to do more than just run the conky command, because conky needs to be started after the desktop shows up, so that conky appears on top. So to do that, create an empty file in your home folder, let's call it .conky-startup.sh, make it executable and put this in it:
#!/bin/bash
sleep 30 && conky ;

Save the file and go to System > Preferences > Startup Applications, click "Add" and add the path to the .conky-startup.sh file, for instance /home/.conky-startup.sh

You may also want to read about a great Conky alternative with HTML support.

Last Week's Top Posts (Week 22, 2009)

CSS Dock Menu is a MacOSX-like Dock for... Your Website

css dock menu jquery

CSS Dock Menu is an amagzing MacOSX-like dock menu for... your website. It uses jQuery javascript library and Fisheye component from Interface and it's very easy to implement in any website.

Also, CSS Dock Menu comes in 2 flavors: for the top or bottom part of your website. If you're a person who knows some CSS and JavaScript, you can modify it to always stay at the bottom or top of the website, even when scrolling (but that's for you to find out how to do it).

The menu has been tested with IE 6, IE 7, Opera 9, Firefox 2, and Safari 2 (although there are some minor rendering issues with Safari).

Resources:
CSS Dock Menu Demo
Download CSS Dock Menu
Step-by-step installation guide

Windows 7 Gmail Notifier with Jumplists

Windows 7 Gmail Notifier Plus allows you to see a preview of all unread mails you have. Clicking on the button in the center will open the mail in Gmail:

photobucket

Unread mails are also accessible from the jump list. Jumplists basically display information and links to common tasks. The Gmail jumplists displays the unread email messages of the Gmail account; Again with the possibility to access the account with the click of the button. Common tasks like going to the inbox or writing a new email are displayed in the jumplist as well which allow a user to quickly access some of the most used features of Google Mail.

photobucket

Download it from here or go to it's forum thread for more info.

[via ghacks]

Ubuntu 9.10 Karmic Koala New Goal: Boot in Less than 10 Seconds

The Ubuntu development team has decided to change the plans and not include Plymouth technology for Ubuntu 9.10, which means they will keep the current USplash system. The purpose of this change is to improve the current boot time (35 seconds on a normal hard drive and less than 20 seconds on a disk SSD) to less than 10 seconds in any disk. Other features to be included in Ubuntu 9.10 are:

- Kernel 2.6.31
- Default EXT4 File System
- And include Gnome Shell in the universe repository.

[via ubuntulife & fayerwayer]

Make Google Adsense Ignore Text Outside of 2 Special Tags

At the 2009 WordCamp in San Francisco something about a Google Adsense tag was relvealed. You can wrap your post text around 2 tags so that all the Adsense ads on the website only take into consideration the text between those tags, and ignores everything outside those tags.

For instance, you can place the start tag above your post title:
<!-- google_ad_section_start -->
And the end tag at the end of the post, but above the related posts section or any other pieces of text you may have under the post:
<!-- google_ad_section_end -->


So that all the ads are based only on the post title and body.

Reverting the Xorg (Video) Intel Driver of Jaunty to 2.4 (of Intrepid)

We already posted 2 solutions to help you with the Intel graphics driver in Ubuntu Jaunty and those 2 workarounds helped a lot of people:

1. By whitelisting the Intel driver (Intel graphic drivers 965 (x3000 or x3100))
2. Experimental video drivers repository

But of course, those didn't work for everybody, so here is yet another way to try and make your Intel graphics card to work under Ubuntu Jaunty, by reverting to the xorg driver of Ubuntu Intrepid:

1. Go to System > Administration > Software Sources, on the second tab click "Add" and add the following lines:
deb http://ppa.launchpad.net/siretart/ppa/ubuntu jaunty main
deb-src http://ppa.launchpad.net/siretart/ppa/ubuntu jaunty main
Then, import the appropriate GPG key:
sudo apt-key adv --recv-keys --keyserver keyserver.ubuntu.com 0xce90d8983e731f79

2. Install the old Intel driver:
sudo apt-get update && sudo apt-get install xserver-xorg-video-intel-2.4

3. Restart X by typing this in a terminal:
sudo /etc/init.d/gdm restart
and see if the graphics performance from Intrepid is restored.

If the above workaround does not work for you, then you can go back to the Ubuntu Jaunty xorg:

1. Go to System > Administration > Software Sources, on the second tab remove the 2 lines you added in step 1 from above.

2. Install the Xorg Intel Jaunty driver back:
sudo apt-get update && sudo apt-get install xserver-xorg-video-intel

3. After installing xserver-xorg-video-intel, restart the computer with:
sudo reboot


You can see people posting the results of this workaround, here. As you can see, it helped a lot of people but obviously not all.

Credits:
phyx for pointing the link
The Ubuntu Wiki

Safely Remove External Media in Linux with Ejecter

photobucketEjecter is a small but very useful utility to safely, easily remove external media. A simple menu that sits in the system notification area, providing you a quick way to unmount external peripherals such as usb pendrives, cd/dvd, external hard disks and so.

To install Ejecter in Ubuntu Jaunty, open a terminal and type:
sudo apt-get install ejecter

For Ubuntu Hardy and Intrepid, download it from here.

You can also install it in any other Linux distro by downloading the source files.

[via Only Ubuntu]

Twitter Traffic Exchange: Retweet.it - Another Form of Twitter Spam?

photobucketA new service, Retweet.it, aims to create an exchange for retweets: for every two tweets you retweet from users of the site, you get one RT in exchange. In other words, it’s doing for retweets what TwitterHIT did for Twitter followers. Personally, I’m not a fan.

Retweeting is supposed to be about sharing content because it’s interesting and your followers will get value out of it. Rwtweet.it changes that motivation: now you’re rewarded for tweeting stuff that might be of no interest to you or you followers: you’re just doing it for the reciprocation. Just like with TwitterHIT, I think it’s a dangerous precedent: if such services get traction, the term “RT” will go from meaning “here’s a valuable tweet” to simply another form of Twitter spam.

[via mashable.com]

Keep Your Windows Desktop Clean with Deskcretary

photobucket

[Windows only] If you are used to store your downloads and other files on your desktop, this is a program that should please you and help you keep your desktop clean and organized.

Once installed, Deskcretary creates a folder on your desktop where it will keep your files and folders sorted by date and file type. These are accessible via Explorer Deskcretary.

You can configure Deskcretary to run automatically whenever you like (daily, weekly or monthly) and exclude certain files or file types.

Download Deskcretary

[via freewares tutos]

Docky: Move it To the Top of the Desktop, Add a MacOSX-like "Genie" Effect and Customize the Icons Zoom


Docky, the new GNOME Do interface in the form of a dock, is getting more and more used and causes sensation among GNU / Linux users.

In this how-to, I will tell you how to customize the zoom effect and behavior of Docky icons. Furthermore, you will be able to change the orientation of the bar so that you can move it on top of the screen, and how to get the "Genie" effect like on Mac OSX when minimizing windows, by using a modification of the Magic Lamp Compiz animation effect.

By using Advanced Configuration Editor in Gnome, you have access to some Docky properties not listed in the preferences, like the option to change Docky's position on the desktop or change maximize effect.

Move Docky to the top of the Desktop


photobucket


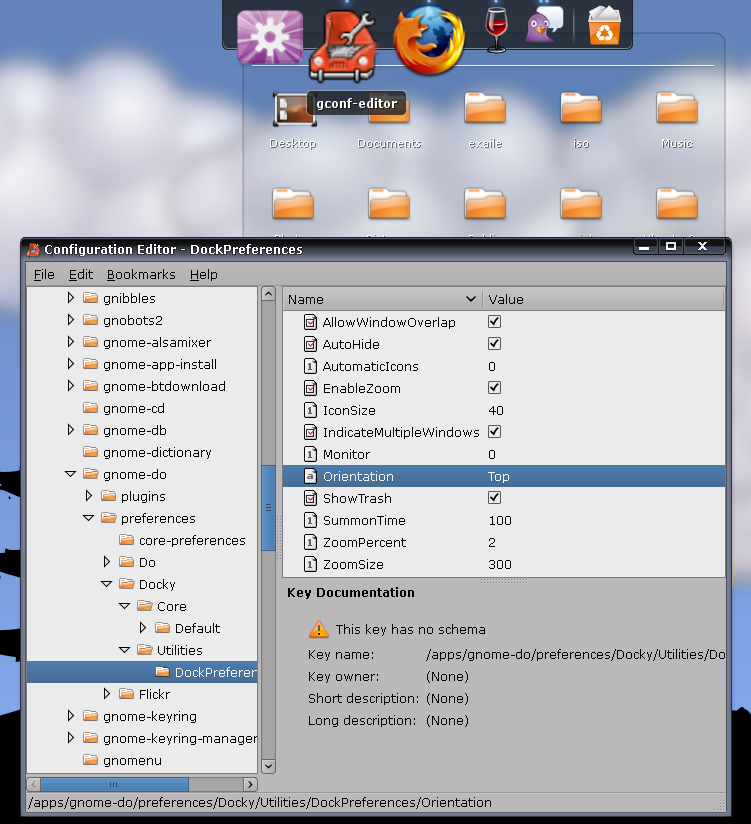
Press Alt+F2, enter: gconf-editor and in this configuration editor, navigate to "Apps -> Gnome Do -> Preferences -> Docky -> Utilities -> Dock Preferences". On the right side there are some properties with their corresponding values, including the position of the dock which you can change from "Bottom" to "Top" to move Docky to the upper part of the desktop. Don't try "left" or "right" as it will not work, but surely it's a a matter of time before this will be incorporated into future versions.

Any changes made do not apply until you restart GNOME Do.

Customizing the zoom


Using gconf-editor you can also customize the zoom used when hovering the mouse over the icons:

* Zoom Percent: The percentage the icons will be magnified when the mouse hovers over them. If set to 1 there will be no zoom, and 3 is quite exaggerated. In my case, for example, I have a value of 1.5 for the zoom with the icons of 25 pixels.

* Zoom size: value in pixels of the distance over which the zoom effect will take place, lets you enter a value to define how many icons are affected by the expansion when the mouse is placed over one of them.

MacOSX-like Genie Minimize Effect


photobucket


Update: I made a video with the "Genie" effect:


To achieve this Mac-like effect you don't have to changes any Docky settings, but Compiz's. Before we get started, make sure you have CCSM installed (Compiz-Config Settings Manager). If you don't,:
sudo apt-get install compizconfig-settings-manager

“Genie” is protected by patent (of Mac) and Compiz decided to disable the option to set “max wave size” of its “Magic Lamp” effect to 0 so that you can not mimic the “Genie” effect with it. But we can still make it work, so read on.

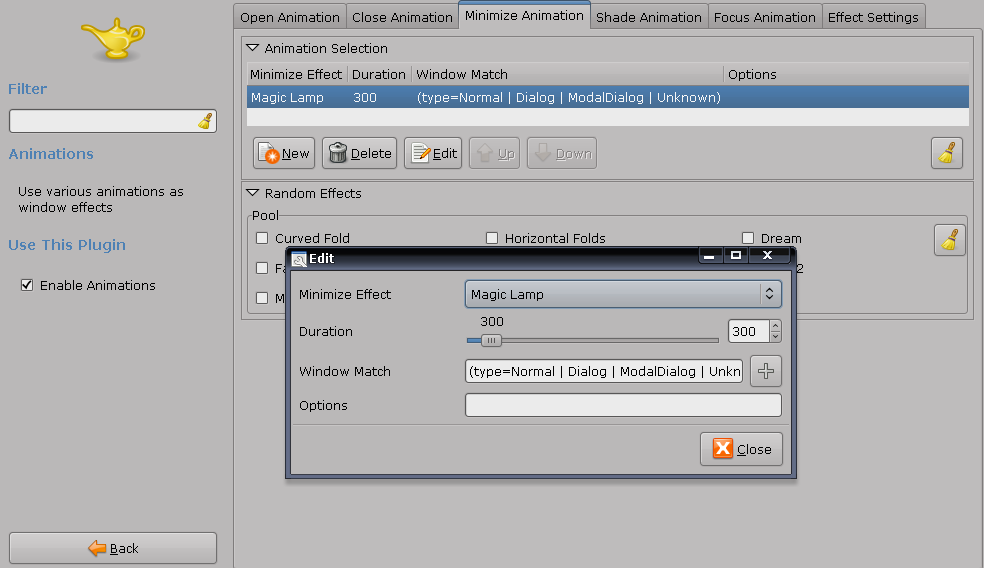
Compiz lets you choose what animation is applied to each type of window action (minimize, maximize, focus ...) and how long the effect should take. So to get the Genie minimize effect, open CompizConfig Settings Manager (System > Prefereces), and under "Effects" check "Animations". Now click on "Animations", go to "Minimize Animation" tab, double click the existing effect and replace it with "Magic Lamp":

photobucket

For the next step, we're going to need a Hex editor. If you don't have one installed:
sudo apt-get install ghex

If using Compiz currently, use Alt+F2 and Type:
metacity --replace

so you don't get any weird behavior until we finish with this.

Now, using ghex we need to edit a Compiz plugin library, so type this in a terminal:
1.
sudo ghex2 /usr/lib/compiz/libanimation.so
a.) Go to Edit->Find, click on the right hand box
b.) Type: magic_lamp_max and click find
c.) Change 3 from 3 to 0
d.) Save, Close

2.
sudo ghex2 /usr/lib/compiz/libanimation.a
a.) Go to Edit->Find, click on the right hand box
b.) Type: magic_lamp_max and click find
c.) Change 3 from 3 to 0
d.) Save, Close

3. sudo gedit /usr/share/compiz/animation.xml

a.) Go to Search->Find
b.) Type: magic_lamp_max and click find, scroll down past the languages
c.) Change 3 from 3 to 0
d.) Save, Close

Restart, log out and back in, or Alt+F2 and Type: Compiz --replace. Any of these should work.

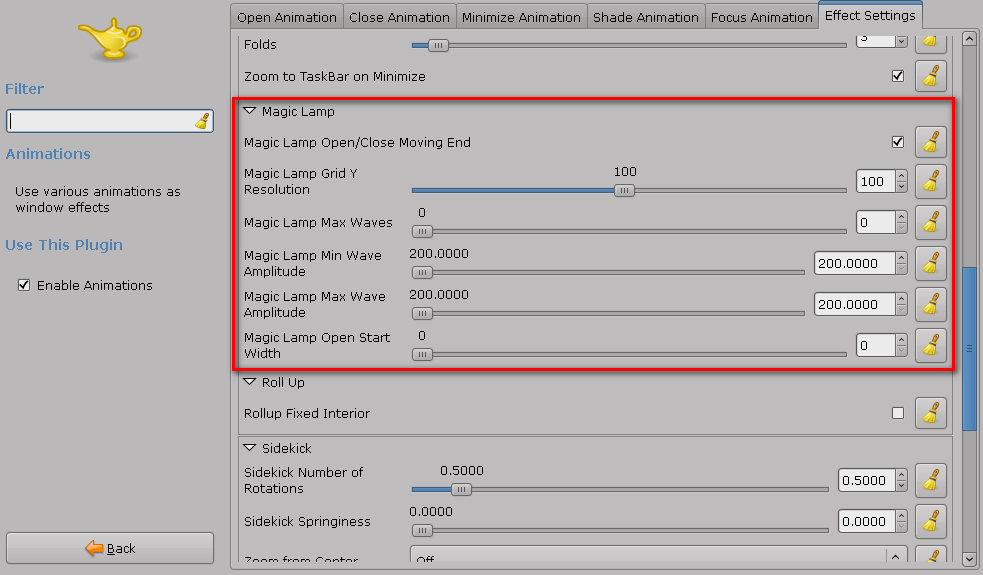
The next step is to use CompizConfig to change the Magic Lamp Settings like in the red rectangle in the image below (System > Preferences > CompizConfig Settings Manager: Animations > the last tab called "Effects Settings"):

photobucket

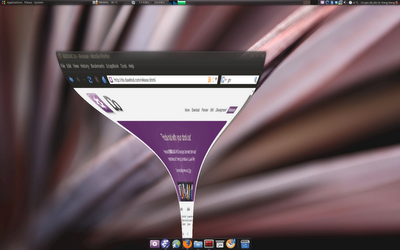
That's it. Enjoy your new customized as hell Docky :D

Credits:
GenBeta for most of this tutorial
Darin user @ ubuntuforums.org
pengdeng.com for the image (i couldn't make the damn print screen, it was just too fast :P) and some other info.
onoametal - that's where i found a link to the GenBeta article - Up The Irons!

Wibiya - Add Functionality to Your Website

photobucket

Wibiya is an application that allows you to include a bar with some interesting features in your website

You can include a button that displays your latest Twitter posts, the posibility of creating a Facebook community, your latest blog posts, random posts and a lot of other options that will appear in a bar at the bottom of your blog.

You can see a demo here.

Wibiya is invite-only for now but you can request an invite and maybe you'll get to enjoy this great multi-functional website bar.

[via wwwhatsnew]

Download Fixed FFmpeg Packages for Ubuntu Jaunty

As you probably know, certain codecs are not activated in FFmpeg in Ubuntu Jaunty (Note: ffmpeg is a command line tool to convert one video file format to another).

To install a 'fixed' version of ffmpeg for Ubuntu Jaunty:
1.
sudo apt-get purge ffmpeg x264 libx264-dev

2. And then install these packages to resolve dependencies:
sudo apt-get update && sudo apt-get install build-essential libfaac-dev libfaad-dev libmp3lame-dev libtheora-dev libxvidcore4-dev

3. Then download and install: ffmpeg and x264 for Ubuntu Jaunty (download both packages - x86 only). If the download does not work for some reason, see the credits at the bottom of the post -> you will find more download links there.

You may also want to read about a nautilus script that makes encoding a lot easier.


[ credits: ubublog via novatillasku ]

Search 30 File Sharing Websites Simultaneously

photobucket

LoadEvery is a search engine for RapidShare, MegaUpload and similar sites which currently includes 30 sites for file sharing. The search may take place simultaneously in all or only in the websites you select and you can filter the results by the type of content you want: mp3, torrent, doc, images and video.

Also, LoadEvery can be added into the list of search engines in Firefox and Internet Explorer.

LoadEvery is a free service and does not requre registration.

Web's Most Dangerous Search Terms: Free Music Downloads, Lyrics and Screensavers

McAfee, one of the world’s largest security technology company, has revealed the most dangerous search terms on the internet and say that searches for Free Music Downloads, Lyrics, or Screensavers are very likely to lead to Adware or Malware laden sites.

McAfee researched over 2600 popular keywords and found that the riskiest set of keyword variations was “screensavers” - 6 out of top 10 search results contain malware! The single riskiest search term “lyrics” - one in every 2 sites will have malware!

Free is not exactly free - clicking on search results with word “free” has a 21.3 percent chance of infecting your computer with spyware, spam, adware, viruses and other malware. Even “Work from home” searches can be about 4 times riskier than the average risk for all popular terms.

Download the McAfee report - The Web’s Most Dangerous Search Terms (.pdf) and read the results in detail.

[via quickonlinetips]

Firefox 3.5 Test Day

Firefox 3.5 is now available for testing. Today is the official test day for RC1 - and Mozilla wants you to get involved!

If you aren't running the latest version, you can download it manually to get started (the build string doesn't yet indicate an RC, but Mozilla has asked that testers run what's available).

More details here.

Clean Glass Firefox [Windows]

Clean Glass FirefoxAfter we wrote about the All-Glass Firefox theme, reader bc//G_A wrote in with an even more impressive customization that enables the Aero Glass effect across almost every UI element.

Enabling the complete glass look requires more than a few steps—you'll need to install the Glasser extension, the Stylish extension, a number of user styles, and another extension to fix up the font colors. All of the instructions for setting up the glass theme can be found in the DeviantART guide, but the glass menus in the screenshot are thanks to the userstyles.org link sent in by reader Scott. Readers should note that the glass menus are a little buggy, and the overall style hides a lot of UI elements you might be used to, so while it's not for everybody it's an interesting customization worth a look for those serious about tweaking their browser.

You'll need to be running the latest beta of Firefox under Windows 7 or Vista to be able to use the glass menus, but you can install an older version of Glasser and use the rest of the glass effects. For more, check out All-Glass Firefox.

Clean Glassed Firefox [DeviantART]
Glass menus [userstyles.org]

Pidgin-Webkit Plugin: Adium Conversation Styles for Pidgin

pidgin-webkit

Adium is a fork of Pidgin for Macintosh, which uses a messaging system based on WebKit (Chrome, Safari, etc,) which has a really cool look.

Here is how the styles I'm talking about look like: http://adiumxtras.com/index.php?a=search&cat_id=5&sort=downloads

To install this in Pidgin (for Ubuntu):

1. Type this in a terminal:
sudo apt-get install pidgin-dev libpurple-dev 

2. Add WebKit repository:

deb http://ppa.launchpad.net/webkit-team/ppa/ubuntu jaunty maindeb-src http://ppa.launchpad.net/webkit-team/ppa/ubuntu jaunty main

For the key, you can use this script to install keys for all PPA repos.

Then, in a terminal:
sudo apt-get update && sudo apt-get install libwebkit-dev

3. Close Pidgin, download this archive (it doesn't work for x86_64, sorry), extract it and copy message_styles and plugins folders to the .purlple folder in your home partition (.purple folder is hidden so press CTRL + H to display hidden files and folders).

4. Open Pidgin, go to Tools > Plugins and check WebKit Message styles, then click on "Configure Plugin" and select your desired style.

Notes & Credits


If you wish to install more styles, download them from here, extract them and copy their folders to /your_home_partition/.purple/message_styles

For other Linux ditros, run this in a terminal to download Pidgin-Webkit:
bzr branch lp:pidgin-webkit
Credits for the compiled package: Nukeador.
Pidgin-WebKit Homepage (probably discontinued).
English guide for non-ubuntu users.
Bazaar Branches for Pidgin-Webkit.

Update: if you use Ubuntu Karmic, see this: Adium Themes in Pidgin Guide.

Bookmarklets Directory

photobucketLove bookmarklets? You know, those small bits of code that you add to your web browser's Favorites menu? With bookmarklets, you can reduce browser bloat by replacing a number of your add-ons with bookmarklets that perform the same actions, yet without the need for extra software installed. And if your default browser is Google Chrome, bookmarklets are even more essential to getting things done since you can't use extensions at all unless you run a developer build.

If you've been looking for a great resource for finding bookmarklets, you're going to love the new site at bmlet.com, an online directory and search engine just for bookmarklets.

On the bmlet homepage, you'll see the highest rated, newest, and most popular bookmarklets listed and there's a search box provided where you can query to find just the one you need.

If you'd rather browse through the listings, you can do so from the "browse" link at the top of the page, but here your only options are sorting them by date or relevance. That's not all that useful, to be honest. (And how are they determining relevance, we wonder?) An alphabetical listing or listing them by category would be a lot more helpful. In fact, it's almost not worth bothering with the browse option at all.

That's really not a big deal, though, since the search engine works just fine. However, it looks like the site still has room to grow - we noticed that they were missing a few of our favorites. For example, we love the "share in Google Reader" bookmarklet, but a search for Google Reader only delivered two results: view feed source and note to Reader. Oh well. (You can see a list of great bookmarklets we're using here). But on the other hand, a search for Twitter left us with so many options it was hard to even choose a favorite.

If, like us, you notice any missing bookmarklets on the site, you don't have to wait for them to add them to their directory - you can just add them yourself. After creating an account, you can click the add bookmarklet link and fill in the title, description, javascript, source link, and tags for the bookmarklet you want to share. Hit "submit" and you're done.

Be warned though - it's very easy to lose track of time when delving into this resource. Instead of giving it a quick once-over, I found myself lost in there for over half an hour today. But what better way to spend a Friday, right?

Audio / Video Encoding Guide

This is a guide on how to encode audio / video in which you will find some tips & tricks for using FFmpeg and other tools.

Video Size and Aspect Ratio


iPhone:


Name Size Aspect
Wide 16:9 480x270 4:3
Old TV 4:3 427x320 16:9
Wide 16:9 /16 480x272 480:272
Old TV 4:3 /16 432x320 432:320

DV NTSC video


Name Size Aspect
Wide 16:9 720x480 16:9
Old TV 4:3 720x480 4:3

Upload to Youtube and Vimeo


Name Size Aspect
SD 4:3 640:480 4:3
HD 16:9 1280x720 16:9

HD, Blu-Ray, AVCHD


Name Size Aspect
720p 1280x720 16:9
1080p/i Anamorphic 1440x1080 16:9
1080p/i 1920x1080 16:9

Frames Per Second


Name Standard Fps FFmpeg
Movies NTSC 23.976 24000/1001
Movies QuickTime N/A 29.976 10000000/417083
TV vídeo NTSC 29.97 30000/1001
Movies PAL 25 25
TV vídeo PAL 30 30

Video encoding with FFmpeg


Config for X264


default fastfirstpass lossless_ultrafast lossless_slower
baseline slowfirstpass lossless_fast lossless_max
normal hq lossless_medium ipod320
main max lossless_slow ipod640

Location of presets in Windows:
C:\usr\share\ffmpeg

Location of presets on Linux:
\usr\share\ffmpeg

High Quality 2 Pass


ffmpeg -y -i INPUT -r 30000/1001 -b 2M -bt 4M -vcodec libx264 -pass 1 -vpre fastfirstpass -an output.mp4ffmpeg -y -i INPUT -r 30000/1001 -b 2M -bt 4M -vcodec libx264 -pass 2 -vpre hq -acodec libfaac -ac 2 -ar 48000 -ab 192k output.mp4

iPod iPhone-width 320


ffmpeg -i INPUT -s 320x240 -r 30000/1001 -b 200k -bt 240k -vcodec libx264 -vpre ipod320 -acodec libfaac -ac 2 -ar 48000 -ab 192k output.mp4

iPod iPhone-width 640


ffmpeg -i INPUT -s 640x480 -r 30000/1001 -b 200k -bt 240k -vcodec libx264 -vpre ipod640 -acodec libfaac -ac 2 -ar 48000 -ab 192k output.mp4

High quality, 2 pass without preconfiguration


ffmpeg -y -i input -r 24000/1001 -b 6144k -bt 8192k -vcodec libx264 -pass 1 -flags +loop -me_method dia -g 250 -qcomp 0.6 -qmin 10 -qmax 51 -qdiff 4 -bf 16 -b_strategy 1 -i_qfactor 0.71 -cmp +chroma -subq 1 -me_range 16 -coder 1 -sc_threshold 40 -flags2 -bpyramid-wpred-mixed_refs-dct8x8+fastpskip -keyint_min 25 -refs 1 -trellis 0 -directpred 1 -partitions -parti8x8-parti4x4-partp8x8-partp4x4-partb8x8-an output.mp4
ffmpeg -y -i input -r 24000/1001 -b 6144k -bt 8192k -vcodec libx264 -pass 2 -flags +loop -me_method umh -g 250 -qcomp 0.6 -qmin 10 -qmax 51 -qdiff 4 -bf 16 -b_strategy 1 -i_qfactor 0.71 -cmp +chroma -subq 8 -me_range 16 -coder 1 -sc_threshold 40 -flags2 +bpyramid+wpred+mixed_refs+dct8x8+fastpskip -keyint_min 25 -refs 4 -trellis 1 -directpred 3 -partitions +parti8x8+parti4x4+partp8x8+partb8x8-acodec libfaac -ac 2 -ar 44100 -ab 128k output.mp4

iPod, iPhone 320 off, without preconfiguration


ffmpeg -i INPUT -s 320x240 -r 30000/1001 -b 200k -bt 240k -vcodec libx264 -coder 0 -bf 0 -flags2 -wpred-dct8x8 -level 13 -maxrate 768k -bufsize 3M-acodec libfaac -ac 2 -ar 48000 -ab 192k output.mp4

iPod, iPhone 640 off, without preconfiguration


ffmpeg -i INPUT -s 320x240 -r 30000/1001 -b 200k -bt 240k -vcodec libx264 coder 0 -bf 0 -refs 1 -flags2 -wpred-dct8x8 -level 30 -maxrate 10M -bufsize 10M-acodec libfaac -ac 2 -ar 48000 -ab 192k output.mp4

iPod, iPhone, custom 2 pass


ffmpeg -y -i input -r 30000/1001 -s 480x272 -aspect 480:272 -vcodec libx264 -b 512k -bt 1024k -maxrate 4M -flags +loop -cmp +chroma -me_range 16 -g 300 -keyint_min 25 -sc_threshold 40 -i_qfactor 0.71 -rc_eq "blurCplx^(1-qComp)" -qcomp 0.6 -qmin 10 -qmax 51 -qdiff 4 -coder 0 -refs 1 -bufsize 4M -level 21 -partitions parti4x4+partp8x8+partb8x8 -subq 5 -f mp4 -pass 1 -an -title "Title" output.mp4
ffmpeg -y -i input -r 30000/1001 -s 480x272 -aspect 480:272 -vcodec libx264 -b 512k -bt 1024k -maxrate 4M -flags +loop -cmp +chroma -me_range 16 -g 300 keyint_min 25 -sc_threshold 40 -i_qfactor 0.71 -rc_eq "blurCplx^(1-qComp)" -qcomp 0.6 -qmin 10 -qmax 51 -qdiff 4 -coder 0 -refs 1 -bufsize 4M -level 21 -partitions parti4x4+partp8x8+partb8x8 -subq 5 -f mp4 -pass 2 -acodec libfaac -ac 2 -ar 44100 -ab 128k -title "Title" output.mp4

DV Video


To DV


ffmpeg -i input -target ntsc-dv -aspect 4:3 -y output.dv

Audio


AAC Stereo High Quality


-acodec libfaac -ac 2 -ar 48000 -ab 192k

AAC Stereo Standard Quality


-acodec libfaac -ac 2 -ar 44100 -ab 128k

High Quality AAC 5.1


-acodec libfaac -ac 6 -ar 48000 -ab 448k

Low Quality AAC 5.1


-acodec libfaac -ac 6 -ar 44100 -ab 224k

AAC AC3 (Recommended: use AviSynth for mapping channel)


ffmpeg -i intput.aac -vn -acodec ac3 -ac 6 -ar 48000 -ab 448k

AC3 to M4V (Mux to be open in another application)


ffmpeg -i input.ac3 -vn -acodec copy output.m4v

AC3 to AAC (does not work as expected)


ffmpeg -i input.ac3 -vn -r 30000/1001 -acodec libfaac -ac 6 -ar 48000 -ab 448k output.aac

Eac3To


AC3 5.1 channel mapping correction


eac3to true_hd.ac3 fixed_true_hd.ac3 -blu-ray -448

AAC to AC3


  1. Open AAC in Audacity or SoundBooth
  2. Export To Wav
  3. Remux the Wav to Wav using FFmpeg:
    ffmpeg -i audio.wav –vn -acodec copy audio-out.wav
  4. Convert to AC3 using EAC3to
    eac3to.exe audio.wav Main.ac3 -448

Other FFmpeg options


-threads thread count
-y overwrite output files
-ss time_off set the start time offset
-t duration record or transcode "duration" seconds of audio/vídeo
-ildct Interlaced


Windows builds:


http://ffmpeg.arrozcru.com/autobuilds
http://sourceforge.net/project/showfiles.php?group_id=205275&package_id=248632


X264 encoding guide in English by Robert Swain:


http://rob.opendot.cl/index.php/useful-stuff/ffmpeg-x264-encoding-guide

[Credits: Rodrigo Polo]


Medit: A Very Interesting Text Editor

photobucket

Medit is a text editor that began as a GGAP component, and then became a separate program. Among its main features are the syntax highlighting for different languages (Perl, Python, C, HTML, to the files. Desktop), support for custom key combination, and also has a section to browse files, and a terminal in another section where you can run the apps you are currently working on.

I'm no programmer, but I work daily with html and javascript and this applications is very helpful.

Download Medit.

If you use Ubuntu, all you have to do is write this in a terminal and Medit will be installed:
sudo apt-get install medit

Exaile (Music Player) 0.3.0a2 Released [Linux]

Exaile is a music manager and player for GTK+ written in Python, quite similar to Amarok. It incorporates automatic fetching of album art, handling of large libraries, lyrics fetching, artist/album information via Wikipedia, Last.fm submission support, and optional iPod support via a plugin.

In addition, Exaile also includes a built-in SHOUTcast directory browser, tabbed playlists (so you can have more than one playlist open at a time), blacklisting of tracks (so they don't get scanned into your library) and more.

New in version 0.3.0a2:

* the queue manager is back, with a shiny new interface.
* a new ratings widget lets you set ratings just by clicking on the star in the rating playlist column.
* dynamic mode now keeps a fixed-size buffer of 5 songs, so you can skip songs you dislike without running out of playlist.
* a new Device Manager which will form the core of our device system for 0.3.0. Currently only supports connecting to and playing music from usb mass storage devices autodetected by HAL.
* many new plugins, and updates to old ones
* LOTS of bugfixes

If you wish to install it (the .deb package didn't work for me), simply run this in a terminal:

bzr checkout lp:exaile


Then to run it:
cd exaile/
sh exaile


To update:
bzr update

"Lightbox" Image Viewing Effect on Every Webpage using a Greasemonkey Script

photobucket
(click the image after the website completely loads to see the effect)

A few days ago we wrote about how to implement into your website an image viewer called Shutter Reloaded, similar to Lightbox. But you can have all the images displayed in Firefox use a similar Lightbox effect, by using a Greasemonkey plugin called Greased Lightbox.

How to use: install then browse over to an image site such as Flickr or perform a Google image search. Click on an image then browse the images with the arrow keys. Press "+" to zoom in, "-" to zoom out, "0" for full size, and "x","Esc", or mouse-click on the image to exit.

The verdict: a very nice effect indeed. Not as fancy and ambitious as, say, something like CoolIris (formerly PicLens) and it’s 3D wall of images, but depending on what you like this may be a good thing.

Compatibility: works with Firefox with Greasemonkey extension or Safari with GreaseKit or Opera 8+

Install Greased Lightbox.

[via freewaregenius.com]

Share Files with Your Web Browser Only (P2P)

photobucketLooking for a good, simple way to send files using only your web browser? As long as you and your recipient have the Flash plugin installed, it doesn't get much easier than Files Over Miles.

Choose a file to share, and FOM creates a hash-like URL for the transfer. Nothing starts moving until the receiver visits the URL and the client kicks in. Once that happens, your data is sent directly to the person at the other end. Nothing is stored on a server and transfers are fully encrypted.

FOM is free to use and will likely stay that way. Since you use your own bandwidth, their expenses should be fairly minimal.

Google I / O Conference: Preview of Google Wave / New Features in Firefox 3.5

Google Wave Preview

Over the last years the web has moved towards more real-timeness and collaboration, with plenty of online communication forms to choose from. Google now is showing off a preview of a new product, framework and protocol called Google Wave. I’ve not seen this in action yet but judging from the screenshots and descriptions, Google Wave (the product) is an app running in modern browsers which is part wiki, part chat, part collaborative office and sharing tool, and part email.

Take a look at the screenshot below, via Google:

To the left side you’ll see a navigation pane offering you to view the Inbox, Active threads – or “waves”, as Google calls them – a history, spam waves and more. The inbox lists threads in which you participate, because (if I understand it right) you started them or were invited. A particular thread can consist of a mail-type conversation with a friend, like “BBQ on Sunday,” or a document sharing photo snapshots, which are drag-and-dropped into the document window.

That document window, to the right, offers the multi-user real time view onto the document, and you apparently can edit in different places within it. You can also play-back the history of the document to see how it evolved. Avatars of the people participating in a particular wave can be seen on top. If two people are online at the same time then “a wave acts just like an instant message – except that you see each character as it is typed,” Tim O’Reilly writes. “When you’re talking with someone, you know what someone is saying before they finish their sentence. You can respond, or even finish their sentence for them. So too with Wave.”

Search is provided at the top of the middle pane. It’s apparently real time, too, and searches can be saved and added to the left side navigation.

Sounds cool? Let’s see what Google will release. “Google Wave will be available later this year,” Google writes on their Wave homepage.

The Firefox team has also used the event that half-world has its eyes on to announce some new features that Firefox 3.5 will bring:

  • Support for HTML 5 which will allow the use of native 3D.
  • The implementation of the HTML tag so that we can stop using "object" and "embed" for embedding flash video players, for example in blog posts.
  • A button called "My location" that once clicked will send us straight to a map of GoogleMaps.
  • Debugging directly in the browser.
  • Improved performance for JavaScript and offline storage.


[via blogoscoped & bitelia]

How to Completely Remove the Recently Accessed Documents under Gnome

[Linux - Gnome] There are people who find it annoying (for privacy reasons) that all documents, images, etc. that were recently accessed appear in the "Recent Documents" sub-menu of "Places". Here's how to make them not show up.

In your personal folder (eg: /home/yourname) there is a file called ".recently-used.xbel". What we need to do is delete this file, and create a folder with the same name.

We need that folder for: when the system tries to generate the file again when you open any document, it cannot create it because there is a folder with the same name.

If you want to do it within a terminal:
cd /home/yourusername

rm .recently-used.xbel

mkdir .recently-used.xbel

Not a very pro way to do it, but it works. One may think you can add a command to cron to remove that file every N minutes, but the recent documents will still appear until system restart (or until you kill the Gnome panel) so the method described in this post it much better.

[via http://www.tuxapuntes.com]

View Your Desktop from Systray with DESKonTOP

photobucket

Windows offers a convenient way to access applications and documents you use often by placing shortcuts to your computer desktop. These shortcuts are fast to click, but what if you have a window that covers your desktop? Minimizing an active window or moving it away to access the desktop may seem a good solution for a while, but what if you work with more than just one or two applications? Those shortcut icons are covered well enough to make you spend a while to minimize or move every window that blocks access.

Opening that same shortcut from the Windows Start menu is even slower. Show Desktop button may seem a solution until you realize that it is impossible to restore your working set after you've launched the shortcut with a single click, and that you have to restore the windows one by one.

DESKonTOP finally solves the puzzle. To launch a shortcut from your desktop simply click DESKonTOP icon near the system clock, and you'll see a small copy of your desktop with all shortcuts and icons. You can easily launch a shortcut from there, and that's it! No need to minimize or move windows around. No need for Start menu exploration. No playing hide-and-seek with your windows. All it takes is one click on DESKonTOP icon, and one more click to launch a shortcut!

Once the mouse cursor is over an icon, DESKonTOP will enlarge it to show you the full-size version of the icon and its text label, allowing you to clearly see and click the shortcut without training your sniper skills.

Still find it difficult to use the small icons on the reduced copy of your desktop? No problem! DESKonTOP is readily customizable, allowing you to fine-tune the appearance of the mini-desktop the way you like, from bigger icons to menu-driven system.


[via instantfundas]

Google Search Shows You The Latest Sport Results

Google has a new OneBox that shows the latest results from Roland Garros, an important tennis tournament held in Paris. If you search for [roland garros] or [tennis], Google shows some recent results, but it's probably a better idea to search for a player's name.


This is not the only sports-related Google OneBox: you can also find results from football (or soccer), the National Hockey League (NHL), National Basketball Association (NBA), Major League Baseball (MLB), cricket, NASCAR or Formula 1.


[via googlesystem.blogspot.com]

Microsoft Unveils Bing

bing
(click to enlarge)

Today, Microsoft publicly unveiled its soon-to-launch search engine Bing. It will become available over the next few days, and be fully launched by June 3. On the surface, Bing has a distinct gloss. The home page features a rotation of stunning photography, for instance, which can be clicked on to produce related image search results. But the most significant changes are under the covers. “We have taken the algorithmic programming up an order of magnitude,” says Microsoft senior vice president Yusuf Mehdi. Each search result page is customized according to what type of search you do (health, travel, shopping, news, sports). The algorithms determine not only the order of results on the page, but the layout of the page itself, concluding what sections appear. These sections can include anything from guided refinements and a list of related searches in the left-hand pane to images, videos, and local results.

I’ve been playing around with a preview version of Bing for about a week. It is designed to be “more of a decision engine,” says Mehdi. Bing helps people make decisions through guided search and a focus on task completion. In a time when a new Website is created every 4.5 seconds, information overload is becoming a real problem. ” People are getting hundreds of thousands of links but not getting what they want,” says Mehdi. Bing tries to alleviate problem by offering up different experiences depending on the search. It also acts more like a destination site for certain searches. Travel and product searches bring in comparison pricing, reviews, images, and more. Hulu videos can be played within the video search results. Bing pulls in data from other Web services when it can so that you often don’t have to leave to get the information you want.

The internal codename for Bing is Kumo (which is what you see in the screenshots), and the current release is called Kiev. Rather than a spare, blank screen, Bing’s homepage surrounds the search box with a single beautiful image, such as the one of the tribesmen above or a kinkajou. You can hover over parts of the image to get factoids about the image or click through to an image search result page to explore more. The left-hand pane offers the option to narrow your search on images, videos, shopping, news, maps, or travel. Each of these has a different look and feel. A travel search will turn up a page based on Microsoft’s Farecast technology asking you where you want to go, with flights, hotels, and destination information. A news search offers up headlines, photos, videos, and local news in a column on the right. A shopping search will bring up products and is tied into Microsoft’s Cashback program.

microsoft bing

Every search also generates a guide on the left to help you refine your search. A search for “kinkajou,” for example, lets you refine by images, facts, sale, breeders, care, diseases, and videos. A search for “Samsung LCD TVs” brings up an entirely different set of guided results: shopping, review, manual, repair, buy, stand, images, and videos. If you search for images of “butterflies,” it lets you sift to show just Monarch, Swallowtail, Viceroy, Owl, and other types of butterflies. All of this categorization and concept-matching is Microsoft’s early attempt to bring in some basic semantic search technologies into a mainstream search engine. Each guided option is dynamically generated, just like the different sections of the search results page. “Google, tried to preempt this,” says Mehdi, referring to Google’s new search refinement options it launched last week, which is also in the left pane. Those Google options, which include the ability to search across different time periods or for related keywords, are “completely static,” criticizes Mehdi. “There is nothing new about it. It is a very minor rev, not as sophisticated as what we are doing. For us ever query is special.”

Bing also takes advantage of Microsoft’s acquisition of Powerset to provide better previews and snippets of text when you hover over a result. Also, whenever a search brings up a “reference” tab in the guided exploration pane, clicking on that will bring up an enhanced Wikipedia article with semantic tags.

Onstage at the D7 conference, Steve Ballmer acknowledges: “There is no way to change the whole game in one step.” But search “deserves a good feature war.” And Bing will be rolling out new features as it goes forward. But is it enough to get people to switch? Bing is certainly not a game-changer, but it does cut out a lot of the back and forth that happens with so many searches today. If Bing can help people find what they are looking for faster, it will put pressure on Google to keep advancing the ball as well.

For the most part, Bing's interface resembles that of today's Live Search, with a large 'cover image' on the front page that surrounds the search box. The major difference in the user interface is the addition of guided searches in the left sidebar, though Microsoft says that the real changes are under the hood. The company argues that it can bring a new approach to Internet search by providing a richer, easier, and more organized search experience. This, for example, means that Bing will integrate data from consumer reviews when a search brings up a restaurant, for example.

Microsoft also launched a new site, Discover Bing, that goes into all the details of how Bing works and the decision process behind the creation of it. And if you still can't get enough news about Bing, our friends over at CNet also feature an in-depth look at how Bing came to be.


[via techcrunch & rrw]

How to Get an Almost Identical Chrome New Tab Page in Firefox

photobucketWe've covered a number of ways to make Firefox new tab page look somewhat similar to Google Chrome's: using add-ons like New Tab King or even a bookmark. Then there's New Tab JumpStart, which blatantly copies Chrome's new tab look.

It's an experimental extension, meaning you'll have to check one box saying you agree that it's not 100 percent approved, and it doesn't always play nice with other tab-controlling extensions like Tab Mix Plus (check the add-on comments for that particular fix). But JumpStart does do a darned good jobs of mimicking the features of Chrome's tab page. There's a customizable grid of your most visited pages, which you can "pin" for permanent position or "X" for removal. Then there's a familiar right-hand list of your recent searches, recent bookmarks, and recently closed tabs.

There are definitely a few kinks to be worked out, especially in the most visited thumb creations, as a good number of pages end up with white or blank thumbnails. And, depending on your browser/OS setup, the background can be either pristine white or clunky gray. If you want a decently close copy of Chrome's new tab page without installing a toolbar, though, it's hard to beat JumpStart's dedication.

KOffice 2.0.0 is Out

After more than three years of intense work to make the office suite compatible with QT4 and KDE4 libraries, KOffice 2 is now available and represents a quantum leap compared with the previous version.

During these three years, the KOffice team has completely rewritten the code in order to improve integration between all components of the suite while seeking to eliminate duplicate functions.

But not all the components that existed in KOffice 1 will be available in version 2 which includes the following applications:

  • KWord - Word processor
  • KSpread - Spreadsheet calculator
  • KPresenter - Presentation manager
  • KPlato - Project management software
  • Karbon - Vector graphics editor
  • Krita - Raster graphics editor
  • The chart application KChart is available as a shape plugin, which means that charts are available in all the KOffice applications in an integrated manner.
As for the absences, the databases tool Kexi will have to wait until version 2.1, while the software for creating flowcharts Kivio still has no release date and is possible to dissapear completely.

Koffice 2.0.0 Screenshots:

photobucketphotobucketphotobucket


The most significant and visible highlights are: the new graphical interface, with a redesign of the work space designed for large screens, and Flake Shape whose mission is to facilitate the integration of components in any of the KOffice applications.

Another important note is that KOffice supports native ODF format thus ensuring interoperability with other applications such as OpenOffice or MS Office.

To install KOffice 2 in Kubuntu, go to Software Sources in your menu, on the "Updates" tab check the "Unsupported updates" repository, then using a terminal:

sudo apt-get update && sudo apt-get install koffice-kde4

Google Chrome 3 !?!?

google chrome 3

Google seems to be dead serious to close the “version-gap” to Mozilla Firefox and probably even other popular Internet browsers such as Internet Explorer or Opera in a hurry. The web browser known as the Google Browser was released less than a year ago and is already reaching version 3 which would close the version gap to the Firefox web browser.

Google Chrome 3 has been published on the dev channel from where it can be downloaded and installed on a computer system running a Microsoft windows operating system.

There are not many exciting new features in the release despite the jump from version 2 to 3. The release notes list 16 changes to Google Chrome 2.0.180.0 which has been released about two weeks ago. The most notable changes are multiple crash fixes, support for the video tag and fixes to user interface elements drawing improperly on the screen.

[via gHacks]

Simplified Search and IE8 Accelerators to Google Chrome: Cleeki

Cleeki

Now that extension support is baked in to Google Chrome, it's likely only a matter of time until we start seeing some really interesting ones appearing. We've already got a preliminary AdBlock and some notifiers, but Cleeki might be the most compelling extension to come along.

Firefox and IE have been able to use Cleeki for ages. It's an excellent way to simplify searching while you browse. Highlight some text, hover over it, and click where you'd like to search. Rather than leave the current web page, Cleeki opens a picture-in-picture results window. Resubmitting to another site is as painless as clicking its icon.

The settings page isn't very functional yet, which is a bit disappointing. As it stands, Cleeki is still a very useful addition to Chrome and it will only get better as the developers have time to finish the port.

[via downloadsquad.com]

New PeopleBrowsr Alpha: Twitter / Facebook Desktop Client

web upd8

There is a heated competition taking place for which Twitter/Facebook desktop client is the fairest of them all. We’ve written about about TweetDeck, Twhirl / Seesmic Desktop, AlertThingy, Sobees, and the clients that focus only on Twitter (Tweetie, Nambu, Twitterific, etc.). Now, PeopleBrowsr, is entering beta with a free Adobe AIR-powered desktop app that integrates Twitter, Facebook and other social networks into one platform.

While in alpha, PeopleBrowsr was able to differentiate itself because it was a web browser based dashboard for social networks, sort of like what Streamy is now. Similar to Tweetdeck and Seesmic Desktop, PeopleBrowsr uses stacks. To add content, you add different stacks for each social network, including Twitter, Facebook, FriendFeed, LinkedIn, Flickr, YouTube, and your RSS feeds. Similar to all the Twitter clients mentioned above, Peoplebrowsr lets you do all the normal twitter activities (read, post, follow/unfollow, DM and reply). And you can update your Facebook status and engage in FriendFeed conversations from the dashboard.

Peoplebrowsr is offering different layouts of the streams according to the type of user you are. You are given the choice to run the app under Business mode, which is interesting given how Twitter, Facebook and others are now seen as marketing and PR tools. Companies, restaurants, brands and celebrities all seem to use Twitter as a business platform in some capacity. On first glance, Peoplebrowsr’s bells and whistles seem to cater towards the enterprise community. Business mode lets users manage multiple usernames within one dashboard (Seesmic does this too), conducts conversation threads within the client, and gives you the ability to share a “stack” via RSS or a URL link.

web upd8

PeopleBrowsr also lets you create Twitter groups within the dashboard around keywords and #hashtags. If a group is built around a #hashtag, every time a new person uses that hashtag they are automatically added to the group. Users can browse public groups made by others as well as those based on popular hashtags.

PeopleBrowsr offers the ability to filter searches on Twitter by location, groups, specific individuals, posts containing links and sentiment associated with keywords. Results can be further sorted by the number of follower and searches saved for future access. PeopleBrowsr can be set up to send email alerts should a specific keyword appear in the stream. Updates and messages that are key can be flagged, and you can add private notes and comments to a specific user or post. You can also add users to a built in address book within the dashboard.

web upd8

For businesses that want to create reports on Twitter feeds, keywords and direct messages, PeopleBrowsr lets you create custom reports can be exported as RSS feeds and retweets (to share publicly.

web upd8

Like Seesmic and Tweetdeck, PeopleBrowsr is powered by Adobe’s AIR platform, which has some strange user interface bugs and quirks and tends to use a good amount of resources on computers.

PeopleBrowsr doesn’t seem to be for the individual who uses a Twitter/Facebook desktop client to simply tweet, follow, DM and update status messages. But for the enterprise community, this application may make tracking social networks for a brand or company much easier. The startup is also retaining the web based browser dashboard that will include all the features of its desktop client. On the consumer side, it will be tough to break into the current race of popular desktop client apps, including Seesmic, Tweetie and Tweetdeck, who all have loyal followings. But it’s wise of PeopleBrowsr to appeal to the enterprise space and this could help the startup make a name for itself out of all the other clients out there.

[via techcrunch]

Specto Notifications: Get Notified Instantly when Updates are Available on the Web [Linux]

spectoSpecto is a Linux-based desktop application that allows you to watch for configurable events and get notified instantly when updates are available. Things that you can monitor include websites, emails, files/folders, system processes and connection ports.

For example, Specto can watch a website for updates (or a syndication feed, or an image, etc), and notify you when there is activity (otherwise, Specto will just stay out of the way). This changes the way you work, because you can be informed of events instead of having to look out for them. If you are monitoring a particular website, like your Facebook account for new messages on your wall, Specto grabs the file size of that site at regular interval and compares it with the previous version. If there are any changes, it will notify you via an unobtrusive popup at the corner of the system taskbar. You can define an error margin so that Specto won’t notify you for small changes to the site (such as rotating ads).

Specto Screenshots:

Add Watch menu - cropped.pngAdd a Watch.pngExport watches.pngLogs.pngPreferences.pngnotification - bazaar français.pngnotification - facebook français.pngnotification - mail.pngnotification icon menu - cropped.pngnotify-osd compliance.pngold website watch notification.pngpopup menu - cropped.png


Specto is available as a package in the software repository of most Linux distros, so Linux users shouldn’t have much difficulty in installing it in your system.

These distributions have Specto in their repositories:
  • Frugalware Linux
  • Debian GNU/Linux
  • Ubuntu
  • (see also the section about "Personal Package Archives" above)
  • Fedora


To get the official main development branch (named specto-main), grab it with this command:
bzr branch lp:specto

You may want to keep your bzr version of Specto updated from time to time. Assuming you are in the directory where you keep the Specto bzr trunk (specto-main), you can do this quite easily:
bzr pull

Running or installing from a tarball or a bzr branch


After extracting the contents of a tarball, you will notice Specto has a bunch of files and folders. Before doing anything remotely productive, you need to make sure you fill the dependencies to make Specto work.

Dependencies


This is the most current list of required software packages needed to compile Specto, based on Ubuntu and Debian's package names.

* bzr (for the bazaar watch plugin, or if you want to grab Specto from a bazaar branch)
* gnome-icon-theme?
* libgnome-keyring0
* librsvg2-common
* python
* python-central
* python-dev (if you run the development version with setup.py)
* python-gconf
* python-glade2
* python-gnome2
* python-gnome2-extras
* python-gtk2 (version 2.10 or higher; this also means you need GTK+2.10 or newer)
* python-numpy (if you have python-gtk2 version 2.14 or higher)
* python-libxml2
* python-notify and python-dbus (to allow notification messages)

Now that you took care of those dependencies, there are two ways to run Specto: running it locally or installing it system-wide.

To run specto without installing it: just run the script
launch.sh

Running Specto by installing it

To install specto system-wide (do this if you have multiple users doing it, if you are a package maintainer or if you want the translations to work). You need to run the setup script as a super-user. Do this in the folder where you extracted Specto:
sudo python setup.py install && sudo gtk-update-icon-cache -f /usr/share/icons/hicolor


[via makeuseof]