Ubuntu / Linux news and application reviews.

Encrypt Conversations in Pidgin on Debian, Ubuntu and Derivatives

Pidgin, the well-known multi-protocol and cross-platform instant messaging client does not encrypt archives so everyone can read them if they know where they are placed on your hard drive. And it's quite easy to find them, on Linux they are in:
/your_home_folder/.purple/logs

So it would be wise to encrypt your conversations so that only when you login into your Pidgin account you can read them.

Encrypt Pidgin Conversations

1. Install Pidgin Off-The-Rectord Messaging plugin:
sudo apt-get install pidgin-otr

2. Run Pidgin, go to Tools > Plugins and check "Off-the-record Messaging", then click on "Config" (at the bottom) and then on the "Generate" button to generate a fingerprint.


3. When entering a conversation you will see a new button on the upper right side of the input. Click on it and then select "Start private conversation" whenever you want to chat in private mode.

Change Your Mac's Time Machine Backup Interval

Time Machine is Apple’s backup system that does incremental snapshots of your hard drive. But there is no GUI way to modify the time between each backup so if you want to modify it, here is how to achieve this:

1. Go to /System/Library/LaunchDaemons and make a backup of the following file, in another folder on your machine:
com.apple.backupd-auto.plist
2. Make sure you have permision to read/write this file. If you can't, add yourself as an administator to the list.

3. Open com.apple.backupd-auto.plist in a text editor and search for this:
<key>StartInterval</key>
<integer>3600</integer>

Change 3600 to whatever interval you want between the backups (in seconds) and save the file.

That's it!

[via maketecheasier]

Docky: Move it To the Top of the Desktop, Add a MacOSX-like "Genie" Effect and Customize the Icons Zoom


Docky, the new GNOME Do interface in the form of a dock, is getting more and more used and causes sensation among GNU / Linux users.

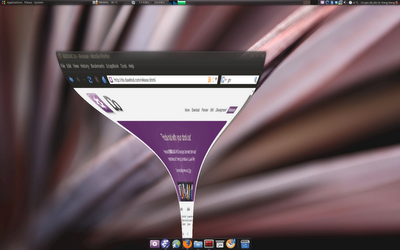
In this how-to, I will tell you how to customize the zoom effect and behavior of Docky icons. Furthermore, you will be able to change the orientation of the bar so that you can move it on top of the screen, and how to get the "Genie" effect like on Mac OSX when minimizing windows, by using a modification of the Magic Lamp Compiz animation effect.

By using Advanced Configuration Editor in Gnome, you have access to some Docky properties not listed in the preferences, like the option to change Docky's position on the desktop or change maximize effect.

Move Docky to the top of the Desktop


photobucket


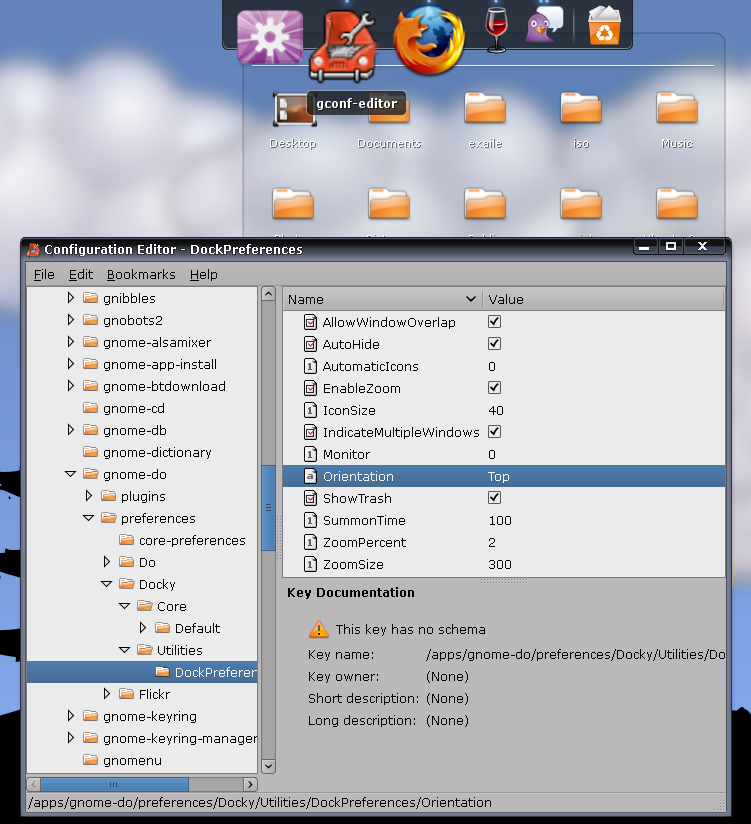
Press Alt+F2, enter: gconf-editor and in this configuration editor, navigate to "Apps -> Gnome Do -> Preferences -> Docky -> Utilities -> Dock Preferences". On the right side there are some properties with their corresponding values, including the position of the dock which you can change from "Bottom" to "Top" to move Docky to the upper part of the desktop. Don't try "left" or "right" as it will not work, but surely it's a a matter of time before this will be incorporated into future versions.

Any changes made do not apply until you restart GNOME Do.

Customizing the zoom


Using gconf-editor you can also customize the zoom used when hovering the mouse over the icons:

* Zoom Percent: The percentage the icons will be magnified when the mouse hovers over them. If set to 1 there will be no zoom, and 3 is quite exaggerated. In my case, for example, I have a value of 1.5 for the zoom with the icons of 25 pixels.

* Zoom size: value in pixels of the distance over which the zoom effect will take place, lets you enter a value to define how many icons are affected by the expansion when the mouse is placed over one of them.

MacOSX-like Genie Minimize Effect


photobucket


Update: I made a video with the "Genie" effect:


To achieve this Mac-like effect you don't have to changes any Docky settings, but Compiz's. Before we get started, make sure you have CCSM installed (Compiz-Config Settings Manager). If you don't,:
sudo apt-get install compizconfig-settings-manager

“Genie” is protected by patent (of Mac) and Compiz decided to disable the option to set “max wave size” of its “Magic Lamp” effect to 0 so that you can not mimic the “Genie” effect with it. But we can still make it work, so read on.

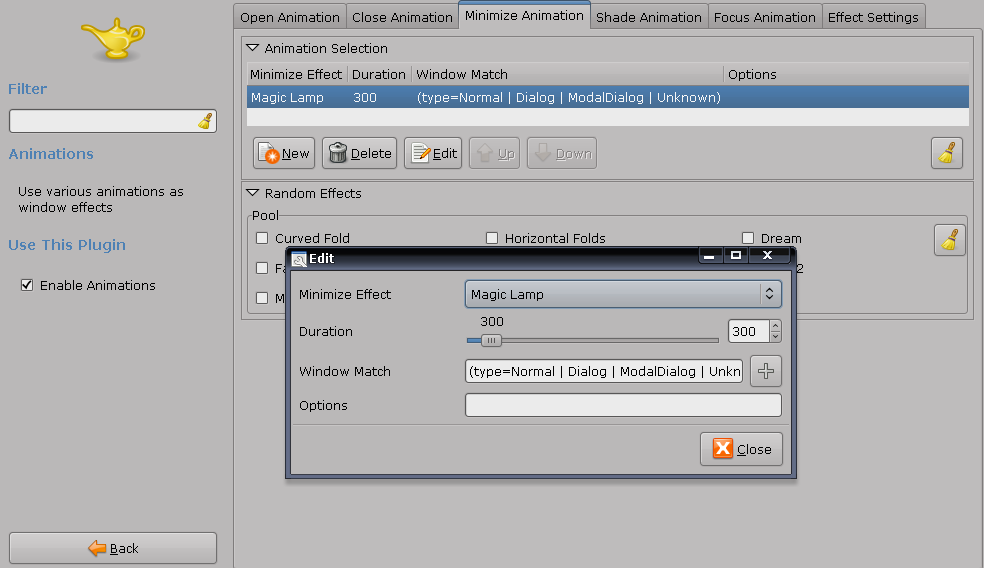
Compiz lets you choose what animation is applied to each type of window action (minimize, maximize, focus ...) and how long the effect should take. So to get the Genie minimize effect, open CompizConfig Settings Manager (System > Prefereces), and under "Effects" check "Animations". Now click on "Animations", go to "Minimize Animation" tab, double click the existing effect and replace it with "Magic Lamp":

photobucket

For the next step, we're going to need a Hex editor. If you don't have one installed:
sudo apt-get install ghex

If using Compiz currently, use Alt+F2 and Type:
metacity --replace

so you don't get any weird behavior until we finish with this.

Now, using ghex we need to edit a Compiz plugin library, so type this in a terminal:
1.
sudo ghex2 /usr/lib/compiz/libanimation.so
a.) Go to Edit->Find, click on the right hand box
b.) Type: magic_lamp_max and click find
c.) Change 3 from 3 to 0
d.) Save, Close

2.
sudo ghex2 /usr/lib/compiz/libanimation.a
a.) Go to Edit->Find, click on the right hand box
b.) Type: magic_lamp_max and click find
c.) Change 3 from 3 to 0
d.) Save, Close

3. sudo gedit /usr/share/compiz/animation.xml

a.) Go to Search->Find
b.) Type: magic_lamp_max and click find, scroll down past the languages
c.) Change 3 from 3 to 0
d.) Save, Close

Restart, log out and back in, or Alt+F2 and Type: Compiz --replace. Any of these should work.

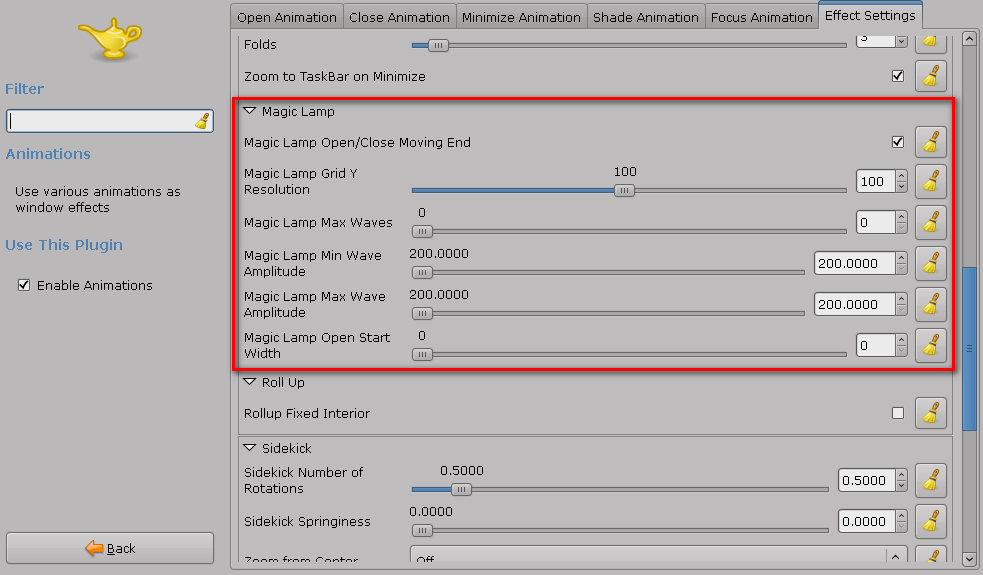
The next step is to use CompizConfig to change the Magic Lamp Settings like in the red rectangle in the image below (System > Preferences > CompizConfig Settings Manager: Animations > the last tab called "Effects Settings"):

photobucket

That's it. Enjoy your new customized as hell Docky :D

Credits:
GenBeta for most of this tutorial
Darin user @ ubuntuforums.org
pengdeng.com for the image (i couldn't make the damn print screen, it was just too fast :P) and some other info.
onoametal - that's where i found a link to the GenBeta article - Up The Irons!

Pidgin-Webkit Plugin: Adium Conversation Styles for Pidgin

pidgin-webkit

Adium is a fork of Pidgin for Macintosh, which uses a messaging system based on WebKit (Chrome, Safari, etc,) which has a really cool look.

Here is how the styles I'm talking about look like: http://adiumxtras.com/index.php?a=search&cat_id=5&sort=downloads

To install this in Pidgin (for Ubuntu):

1. Type this in a terminal:
sudo apt-get install pidgin-dev libpurple-dev 

2. Add WebKit repository:

deb http://ppa.launchpad.net/webkit-team/ppa/ubuntu jaunty maindeb-src http://ppa.launchpad.net/webkit-team/ppa/ubuntu jaunty main

For the key, you can use this script to install keys for all PPA repos.

Then, in a terminal:
sudo apt-get update && sudo apt-get install libwebkit-dev

3. Close Pidgin, download this archive (it doesn't work for x86_64, sorry), extract it and copy message_styles and plugins folders to the .purlple folder in your home partition (.purple folder is hidden so press CTRL + H to display hidden files and folders).

4. Open Pidgin, go to Tools > Plugins and check WebKit Message styles, then click on "Configure Plugin" and select your desired style.

Notes & Credits


If you wish to install more styles, download them from here, extract them and copy their folders to /your_home_partition/.purple/message_styles

For other Linux ditros, run this in a terminal to download Pidgin-Webkit:
bzr branch lp:pidgin-webkit
Credits for the compiled package: Nukeador.
Pidgin-WebKit Homepage (probably discontinued).
English guide for non-ubuntu users.
Bazaar Branches for Pidgin-Webkit.

Update: if you use Ubuntu Karmic, see this: Adium Themes in Pidgin Guide.

How to Completely Remove the Recently Accessed Documents under Gnome

[Linux - Gnome] There are people who find it annoying (for privacy reasons) that all documents, images, etc. that were recently accessed appear in the "Recent Documents" sub-menu of "Places". Here's how to make them not show up.

In your personal folder (eg: /home/yourname) there is a file called ".recently-used.xbel". What we need to do is delete this file, and create a folder with the same name.

We need that folder for: when the system tries to generate the file again when you open any document, it cannot create it because there is a folder with the same name.

If you want to do it within a terminal:
cd /home/yourusername

rm .recently-used.xbel

mkdir .recently-used.xbel

Not a very pro way to do it, but it works. One may think you can add a command to cron to remove that file every N minutes, but the recent documents will still appear until system restart (or until you kill the Gnome panel) so the method described in this post it much better.

[via http://www.tuxapuntes.com]

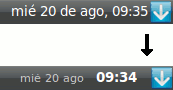
How to Change The Look of the Time and Date in Gnome

photobucket

To do this we only need to change two lines in the Configuration Editor. Here's how to do it:

1. Press Alt + F2 and enter:
gconf-editor

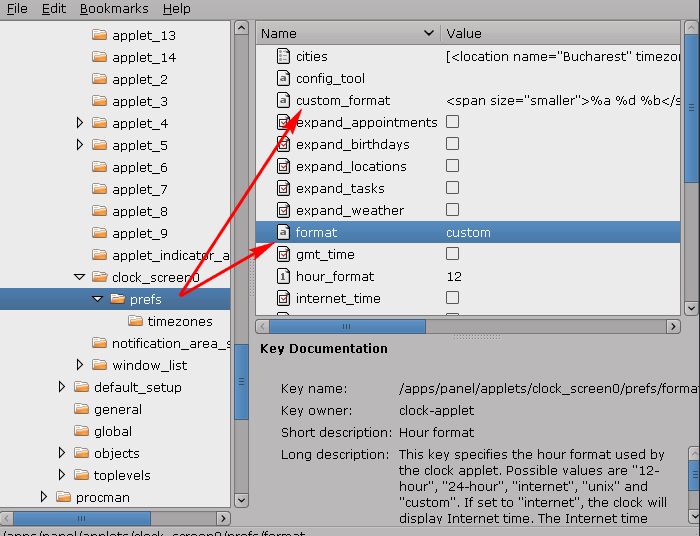
2. In gconf editor, navigate to apps > panel > applets > clock_screen > prefs

photobucket

3. In the custom_format field, write:
<span size="smaller" color="#c8c8c8">%a %d %b </span> <b>%H:%M</b>
In the color field, write the color in hexadecimal format. That will be the color of the date.

4. In the "Format" field (still in apps > panel > applets > clock_screen > prefs), write: custom

5. Close the configuration editor (gconf-editor) and see the changes on our desktop.

Of course, you can play with the code above and change it anyway you want.

To reset this, re-open the Configuration Editor, leave the "custom_format" field blank and in the "format" field, enter 12-hour or 24-hour.

[via tuxapuntes]

Limit CPU Usage By Process [Linux]


cpulimit is a simple program that attempts to limit the cpu usage of a process (expressed in percentage, not in cpu time). This is useful to control batch jobs, when you don't want them to eat too much cpu. It does not act on the nice value or other scheduling priority stuff, but on the real cpu usage. Also, it is able to adapt itself to the overall system load, dynamically and quickly.

To use cpulimit, first download it then extract the archive, use the terminal to navigate to it's folder and:
make
cp cpulimit /usr/local/sbin/
rm -rf cpulimit*
Ubuntu users: all you have to do is open a terminal and type this:
sudo apt-get install cpulimit

cpulimit examples:

Limit the process 'bigloop' by executable name to 40% CPU:
cpulimit -e bigloop -l 40
cpulimit -e /usr/local/bin/bigloop -l 40
So for Firefox, you would have to:
cpulimit -e firefox -l 40
Limit a process by PID to 55% CPU:
cpulimit -p 2960 -l 55
Launch a process by command line and limit it to 40% (in development version only!):
cpulimit -l 40 /etc/rc.d/rc.boinc start

To find out the pid of an application, simply type this in a terminal:

-for all applications running:
ps -e
-for a specific application (for example Firefox):
pidof firefox
(you may also want to check out our list of 20 great Linux terminal commands)


Notes

If your machine has one processor you can limit the percentage from 0% to 100%, which means that if you set for example 50%, your process cannot use more than 500 ms of cpu time for each second. But if your machine has four processors, percentage may vary from 0% to 400%, so setting the limit to 200% means to use no more than half of the available power. In any case, the percentage is the same of what you see when you run top.

cpulimit should run at least with the same user running the controlled process. But it is much better if you run cpulimit as root, in order to have a higher priority and a more precise control.
Now cpulimit does limit also the children of the specified process. The code is still experimental, so let me know how it is.

[via ciberciti]

Integrate Google Gadgets with Plasma in Kubuntu 9.04 Jaunty

google gadgets kubuntu

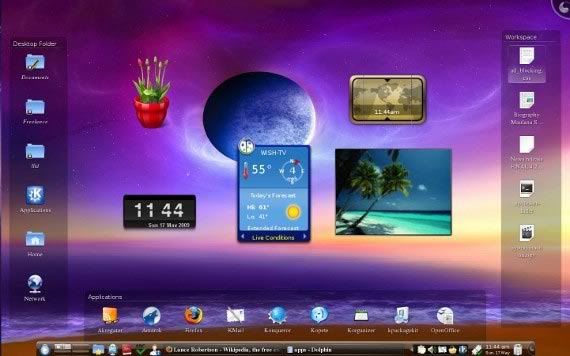
With the release of KDE 4.2, Google Gadgets became fully integrated into Plasma. You can add them to your desktop with a few clicks of your mouse, unless you happen to be a Kubuntu user. For reasons that are outside the scope of this article, Kubuntu developers decided to remove the Google Gadget code from Plasma. Being the stubborn hackers that we are, however, we are going to get them back. This will require a little compiling of software, but I will walk you through each step.

All of these steps assume that you have the latest Kubuntu version 9.04 “Jaunty Jackalope”. It might work with earlier versions, although I make no guarantees.

The good news is that the Google Gadgets libraries are still in the kdebase source. You just have to rebuild the kdebase-workspace package.

1. The first thing that I recommend doing is creating a working directory:

Start Konsole and type:
mkdir kde4-build
cd kde4-build

2. Install the Google Gadgets library packages:
sudo apt-get install libggadget-qt-1.0-dev
sudo apt-get install libggadget-1.0-dev

3. Install the kdebase-workspace source package and its dependencies:
sudo apt-get source kdebase-workspace
sudo apt-get build-dep kdebase-workspace

4. Next, you will need to configure the kdebase-workspace source to prepare it for building:
cd kdebase-workspace-4.2.1a
cmake .

5. You only need to compile the Google Gadgets script engine portion:
cd plasma/scriptengines/google_gadgets
make

6. Finally, just copy the Google Gadget binaries to their proper locations:
sudo cp ../../../lib/plasma_package_ggl.so /usr/lib/kde4/
sudo cp ../../../lib/plasma_scriptengine_ggl.so /usr/lib/kde4/
sudo cp plasma-packagestructure-googlegadgets.desktop /usr/share/kde4/services/
sudo cp plasma-scriptengine-googlegadgets.desktop /usr/share/kde4/services/
sudo cp plasma-applet-ggl-photos.desktop /usr/share/kde4/services/
sudo cp plasma-applet-ggl-rss.desktop /usr/share/kde4/services/

7. Restart KDE

When you log back into KDE, you should now have support for Google Gadgets.

8. Open the add widgets dialog as you normally would, click on “Install New Widgets”, and then click “Download New Google Gadgets”.

When you add Google Gadgets from the Gadget Browser, they will appear in the normal Plasma dialog, which you can then use to add to your desktop. If, for some reason, you do not see all 61 gadgets, you might need to start Google Gadgets independently once, close it, restart plasma, and then try again.

[Credits http://maketecheasier.com and Francesco Santini]