Ubuntu / Linux news and application reviews.

How To Get A 3 Dimensional (3D) Docky [Quick Linux Tip]

docky 3d

Firsly, if you do not have Docky installed, you will find installation instructions for Ubuntu Karmic HERE.

Then, to enable the ThreeDimensional (3D) Docky mode, simply paste this in a terminal:
gconftool-2 -t bool -s /apps/docky-2/Docky/Interface/DockPreferences/Dock1/ThreeDimensional true


Then close Docky (if opened) and run it again. If you have more than one Docky, replace "Dock1" in the command above with the dock you want to enable 3D mode for.

To revert this change, simply run the command again, with "false" instead of "true" at the end.

All the credits go to Whise for finding this (thank you!).

Docky Official Development PPA [Ubuntu]

docky

As you probably know, Docky will not be a part of Gnome Do anymore. There was a PPA to install the development version of Docky in Ubuntu, but the Docky package has been removed. Fortunately, there now is an official Docky development PPA.

Install Docky And Update Gnome Shell From A Repository (Launchpad PPA) [Ubuntu Karmic]

I will firstly post instructions on how to add the PPA repository, and then explain what's up Docky and Gnome Shell.

The following commands (must be run in a terminal) will add the Karmic Testing PPA by Rico Tzschichholz. Obviously, this will only work for Ubuntu Karmic Koala:

sudo add-apt-repository ppa:ricotz/testing


Then:
sudo apt-get update


That's it. This repository contains the following packages:

-Docky (version 2.0~bzr315-0 at the time of writing this post) - the dock bar part of Gnome Do (read on!)

-Gnome Shell (v. gnome-shell 2.28.1~42-g17c8) with Mutter (v. 2.28.0)

-Clutter (v. 1.0.8) - a highly promising rich graphical interface library designed by OpenedHand that is built with OpenGL and provides a GObject-based API. Clutter is still fairly new but is generating considerable excitement in the GNOME development community because it supplies a lot of much-needed graphics functionality that simply isn't supported natively by GTK+.

-InkScape (v. 0.47 Beta 4 pre) - an Open Source vector graphics editor, with capabilities similar to Illustrator, CorelDraw, or Xara X, using the W3C standard Scalable Vector Graphics (SVG) file format. This repository seems to have the most up to date version of InkScape Ubuntu builds (we've previously written on installing InkScape 0.47 Beta 3 pre, but that repository hasn't been updated. Still, if you don't use Karmic, use that repository for installing InkScape 0.47 beta 3 pre).

-A few other packages. Check them out, HERE.

Separate Docky installation


docky

'Show Desktop' Applet For Docky (Gnome-Do)

docky show desktop

Update: Docky now has it's own "Show Desktop" applet, but Docky and Gnome DO are separate applications for a while and a lot of people are still using the old Docky integrated into Gnome DO, so this should still be useful.

I know a lot of you are using Gnome Do for quite some time, but I've only recently switched to it. One of the most annoying things when running it in Docky mode (Dock bar) is that it doesn't have to many applets, and I can live with that but now without a "Show Desktop" shortcut.

Yes, you can use a keyboard shortcut for showing the desktop, but I wanted this in Gnome Do / Docky and managed to create an applet (actually a script) to use in Docky.

The main challenge was to find a way to show / hide the windows from within a terminal. Then I found wmctrl, a tool which can hide / restore your windows from the command line.

The following instructions are for Ubuntu / Gnome, but should work for other Linux distributions / desktop environments too.

Use Gnome-Do To Control Rhythmbox, Banshee, Exaile and XMMS2 [Full Howto]

gnome do rhythmbox

This tutorial will explain how to use Gnome-Do to control Rhythmbox, Banshee, Exaile and XMMS2. Before we get started, I suggest you watch this video I just recorded to see how Gnome Do can interact with these music players:


Why use Gnome-Do to Control your music player?


GNOME Do allows you to quickly search for many items present on your desktop or the web, and perform useful actions on those items. Gnome Do also comes with numerous plugins which includes a plugin to control Rhythmbox, Banshee, one for Exaile and one for XMMS2. Using these plugins you can press Ctrl + Space on your keyboard and then for instance type in an artist name, song name or album, then use the "Tab" button to either play or queue the selected track(s) or albums, increase or decrease the sound level and so on, and you get to do all this without going to your music player GUI, but within Gnome Do.


Installing Gnome Do


If you already have Gnome Do installed, skip this step.

I am only going to tell you how to install it in Ubuntu, for other distros, follow the instractions on the Gnome Do website.

To install Gnome Do in Ubuntu, open a terminal and paste the following command to add the Gnome DO PPA repository:

-For Ubuntu Hardy Heron:
sudo sh -c "echo 'deb http://ppa.launchpad.net/do-core/ppa/ubuntu hardy main' >> /etc/apt/sources.list"

-For Ubuntu Intrepid Ibex:
sudo sh -c "echo 'deb http://ppa.launchpad.net/do-core/ppa/ubuntu intrepid main' >> /etc/apt/sources.list"

-For Jaunty Jackalope:
sudo sh -c "echo 'deb http://ppa.launchpad.net/do-core/ppa/ubuntu jaunty main' >> /etc/apt/sources.list"

-For Karmic Koala:
sudo sh -c "echo 'deb http://ppa.launchpad.net/do-core/ppa/ubuntu karmic main' >> /etc/apt/sources.list"

Then, for any of the above Ubuntu versions, paste this in a terminal to import the PPA key:
sudo apt-key adv --keyserver keyserver.ubuntu.com --recv-keys 77558DD0

And then to install Gnome Do:
sudo apt-get update && sudo apt-get install gnome-do


Using Gnome Do to control Rhythmbox


The first thing you need to do is go to the Gnome Do preferences and under the "Plugins" tab (official plugins), check "Rhythmbox":

gnome-do plugins

Then, launch GNOME Do and type the name of an artist in your music collection. Once the artist you want is shown press the right arrow key to view a list of albums beneath that artist. You can select albums by using the up and down keys. This list is also searchable (so for example if I had searched for Iron Maiden and had a list of albums, typing The Trooper at this point would select The Trooper). To view tracks in the selected album press the right arrow key again.

At any point pressing enter will play the selection in Rhythmbox. So, if I type Iron Maiden and press enter all Iron Maiden songs are enqueued, if I go across to The Trooper and press enter...(you can see where this is going). Clever, isn't it?

Now, what about queuing songs up? The procedure is basically the same but we need to change the action from 'Play' to 'Queue'. Once you have selected the music you want (The Trooper yet again) press tab to change focus to the Action box and press the down arrow to change the Action.

To queue multiple songs, press the comma (,) key when on a song, move to another song, press comma on your keyboard again and so on, then press "Tab", then the down arrow and select "Queue" and all the selected tracks will be added to the queue in Rhythmbox.

We can perform other music related actions too by typing them! For example...type Pause to... pause! Others include:

  • Play
  • Volume up
  • Volume down
  • Show current track
  • Mute
  • and finally Unmute
Unfortunately, if you have your music library in more than one location and have imported it into Rhythmbox, that part of your music collection won't be seen by Gnome Do. But there is a way around this. What we need to do is add multiple locations to your Rhythmbox library. To do this, press ALT + F2 on your keyboard and enter: gconf-editor and navigate to: apps > Rhythmbox. You will there see key which is named "library_locations". Double click it, and then click "Add" to add all your music files locations:

gconf-editor rhythmbox

To add a location, add "file://" in front of it. For instance, to add your /home/music folder, you need to enter: file:///home/music

Then open Rhythmbox, go to Edit > Preferences, on the "Music" tab, and check "Watch my library for new files". Now wait for the library to be scanned and then you can start using Gnome-Do to control Rhythmbox.


Using Gnome Do to control Banshee


The first thing you need to do is go to the Gnome Do preferences and under the "Plugins" tab (official plugins), check "Banshee Media Player":

gnome do plugins banshee

You can control Banshee in the same way as Rhythmbox (read above) but you will only see the files from your music library in Gnome Do, the imported music will not show up. Also, there is no workaround like with Rhythmbox to use multiple library locations by tweaking gconf and also it doesn't work by using symbolic links either so if you want the whole functionality, go with Rhythmbox.

One more note: I have tried Gnome Do with the latest Banshee 1.5.0 (aka 1.6.1 Beta) from the Banshee experimental PPA and it does not work.


Using Gnome Do to control XMMS2


The first thing you need to do is go to the Gnome Do preferences and under the "Plugins" tab (Community plugins), check "XMMS2":

gnome do xmms2


Built off the original Rhythmbox plugin, most of the functionality is the same.

There are several basic commands to control your xmms2 playback directly. play plays, pause pauses, stop stops. There are also previous and next commands, as well as volume up, volume down and mute. All commands can be seen under xmms2 Music, by selecting in in Do and pressing right, the same way folders are browsed into.

One last simple command, Queue All, queues your entire music library in the Default playlist. This operation is fast (due to the nature of xmms2), but be careful, as viewing your default playlist in Do can then take a very long time, depending on the size of your library.

You can browse your xmms2 library through Do, and play or queue artists, albums, or songs. This can be done 2 ways. The first is to simply search for an artist or album by name, then browse deeper into it by pressing right, just like browsing folders. The second is to go in through browse artists or browse albums. This will give you a list of just artists or just albums respectively. You can right arrow into artists to get their albums, and right arrow into albums to get their songs. All 3 levels can be played and queued.

One key difference between the Rhythmbox plugin and this one is that every artist has a Songs album added to their album list. This album contains all their songs, so if you want to queue several songs from different albums (To queue multiple songs, press the comma (,) key when on a song, move to another song, press comma on your keyboard again and so on, then press "Tab", then the down arrow and select "Queue" and all the selected tracks will be added to the queue in XMMS2.), or if you want to just see all the songs by an artist, this will allow you to. Note, the Songs album is not available for queueing or playing, because it doesn't actually exist. If you want to queue or play all songs by an artist, simply queue or play the artist.

The XMMS2 plugin also supports playlists! Playlists are indexed as items by Do, and can be browsed into using right, just like directories or artists. Browsing into a playlist will give you (surprise) a list of songs in that playlist. They should be in order (although they won't necessarily be), and you can select songs from the playlist to queue or play just like with songs from an album.

In addition, you can perform many actions on the playlists themselves. Play, Clear Playlist, Shuffle Playlist, Load Playlist, Remove Playlist, Repeat, and Queue pretty much explain themselves.

One last playlist related action is Create Playlist, which pretty much explains itself, and allows you to name your playlist.


Using Gnome Do to control Exaile


The first thing you need to do is go to the Gnome Do preferences and under the "Plugins" tab (Community plugins), check "Exaile". The functionality is the same as for Rhythmbox so read about it above ("Using Gnome Do to control Rhythmbox). One thing though: the queue functionality has not been implemented in the Exaile plugin for Gnome Do, so for now you can only play tracks.

If you have something to add or point out something wrong in this post, feel free to comment!

Docky: Move it To the Top of the Desktop, Add a MacOSX-like "Genie" Effect and Customize the Icons Zoom


Docky, the new GNOME Do interface in the form of a dock, is getting more and more used and causes sensation among GNU / Linux users.

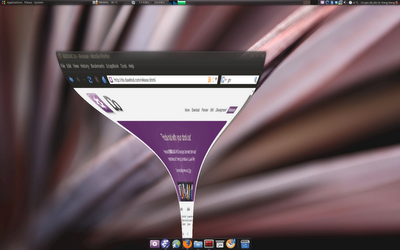
In this how-to, I will tell you how to customize the zoom effect and behavior of Docky icons. Furthermore, you will be able to change the orientation of the bar so that you can move it on top of the screen, and how to get the "Genie" effect like on Mac OSX when minimizing windows, by using a modification of the Magic Lamp Compiz animation effect.

By using Advanced Configuration Editor in Gnome, you have access to some Docky properties not listed in the preferences, like the option to change Docky's position on the desktop or change maximize effect.

Move Docky to the top of the Desktop


photobucket


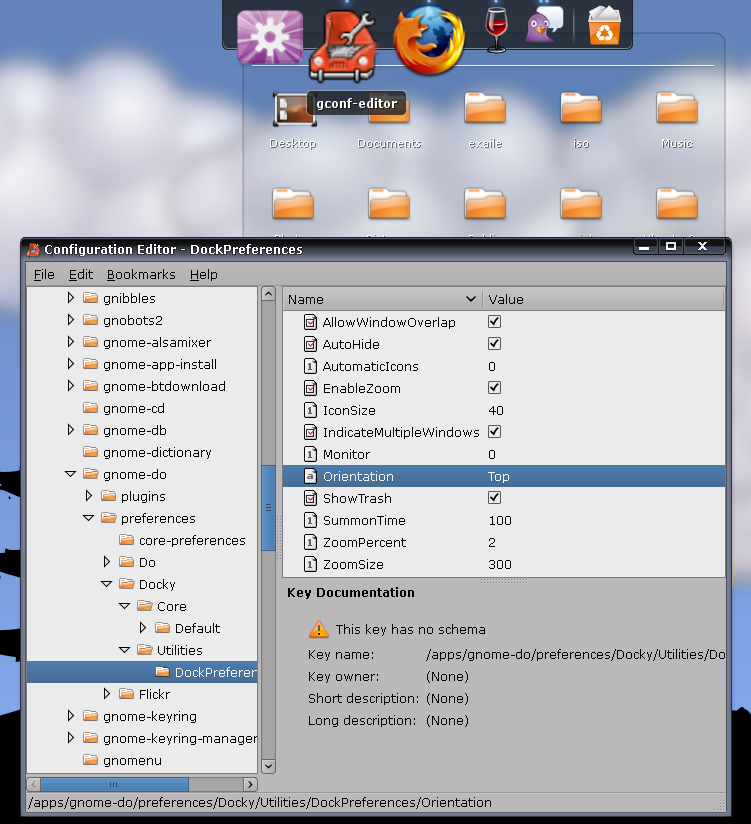
Press Alt+F2, enter: gconf-editor and in this configuration editor, navigate to "Apps -> Gnome Do -> Preferences -> Docky -> Utilities -> Dock Preferences". On the right side there are some properties with their corresponding values, including the position of the dock which you can change from "Bottom" to "Top" to move Docky to the upper part of the desktop. Don't try "left" or "right" as it will not work, but surely it's a a matter of time before this will be incorporated into future versions.

Any changes made do not apply until you restart GNOME Do.

Customizing the zoom


Using gconf-editor you can also customize the zoom used when hovering the mouse over the icons:

* Zoom Percent: The percentage the icons will be magnified when the mouse hovers over them. If set to 1 there will be no zoom, and 3 is quite exaggerated. In my case, for example, I have a value of 1.5 for the zoom with the icons of 25 pixels.

* Zoom size: value in pixels of the distance over which the zoom effect will take place, lets you enter a value to define how many icons are affected by the expansion when the mouse is placed over one of them.

MacOSX-like Genie Minimize Effect


photobucket


Update: I made a video with the "Genie" effect:


To achieve this Mac-like effect you don't have to changes any Docky settings, but Compiz's. Before we get started, make sure you have CCSM installed (Compiz-Config Settings Manager). If you don't,:
sudo apt-get install compizconfig-settings-manager

“Genie” is protected by patent (of Mac) and Compiz decided to disable the option to set “max wave size” of its “Magic Lamp” effect to 0 so that you can not mimic the “Genie” effect with it. But we can still make it work, so read on.

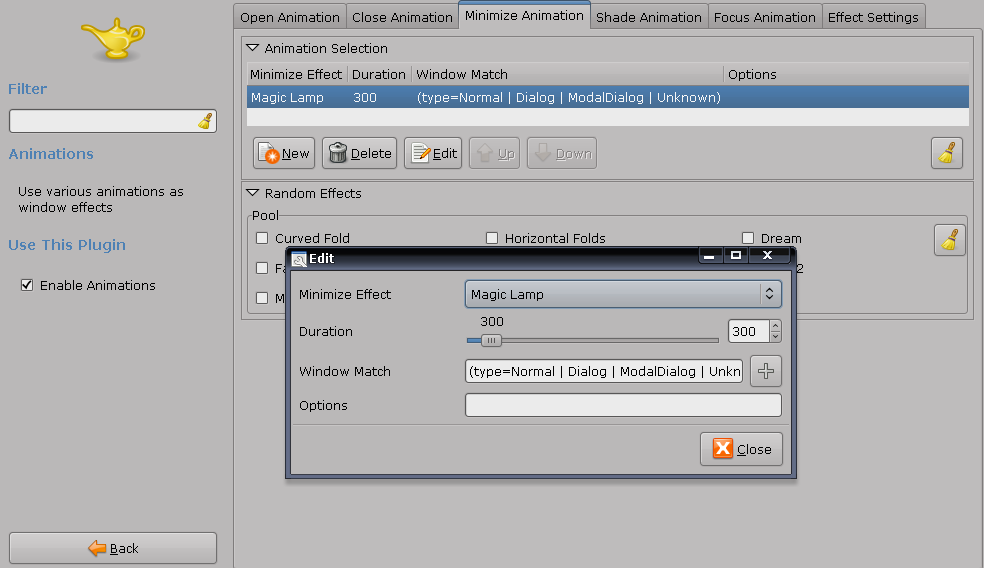
Compiz lets you choose what animation is applied to each type of window action (minimize, maximize, focus ...) and how long the effect should take. So to get the Genie minimize effect, open CompizConfig Settings Manager (System > Prefereces), and under "Effects" check "Animations". Now click on "Animations", go to "Minimize Animation" tab, double click the existing effect and replace it with "Magic Lamp":

photobucket

For the next step, we're going to need a Hex editor. If you don't have one installed:
sudo apt-get install ghex

If using Compiz currently, use Alt+F2 and Type:
metacity --replace

so you don't get any weird behavior until we finish with this.

Now, using ghex we need to edit a Compiz plugin library, so type this in a terminal:
1.
sudo ghex2 /usr/lib/compiz/libanimation.so
a.) Go to Edit->Find, click on the right hand box
b.) Type: magic_lamp_max and click find
c.) Change 3 from 3 to 0
d.) Save, Close

2.
sudo ghex2 /usr/lib/compiz/libanimation.a
a.) Go to Edit->Find, click on the right hand box
b.) Type: magic_lamp_max and click find
c.) Change 3 from 3 to 0
d.) Save, Close

3. sudo gedit /usr/share/compiz/animation.xml

a.) Go to Search->Find
b.) Type: magic_lamp_max and click find, scroll down past the languages
c.) Change 3 from 3 to 0
d.) Save, Close

Restart, log out and back in, or Alt+F2 and Type: Compiz --replace. Any of these should work.

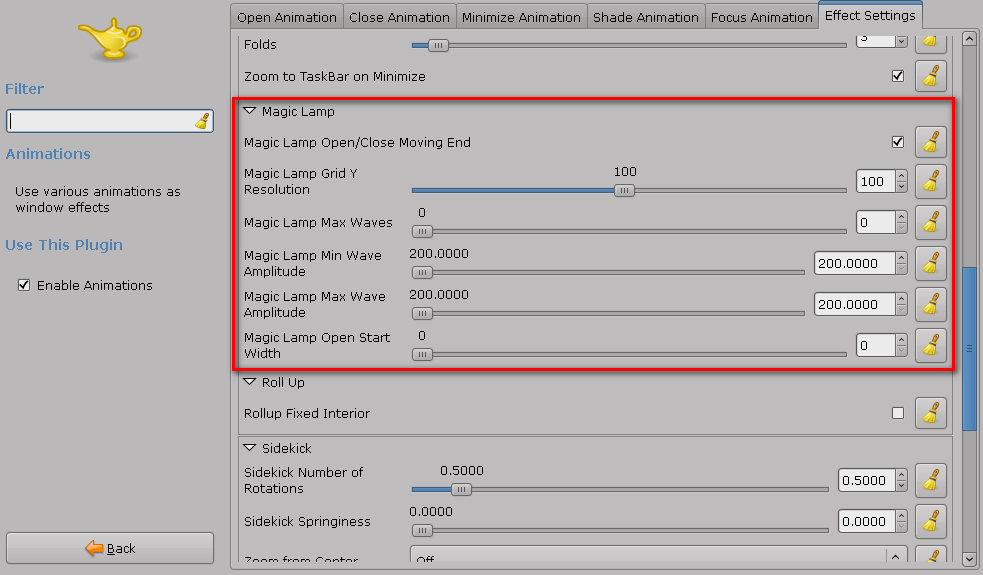
The next step is to use CompizConfig to change the Magic Lamp Settings like in the red rectangle in the image below (System > Preferences > CompizConfig Settings Manager: Animations > the last tab called "Effects Settings"):

photobucket

That's it. Enjoy your new customized as hell Docky :D

Credits:
GenBeta for most of this tutorial
Darin user @ ubuntuforums.org
pengdeng.com for the image (i couldn't make the damn print screen, it was just too fast :P) and some other info.
onoametal - that's where i found a link to the GenBeta article - Up The Irons!