Ubuntu / Linux news and application reviews.

Microsoft to Protect Pirated Window 7 Copies

photobucket

Softpedia reports that pirated copies of Windows 7 will be provided with security updates, update rollups, and even service packs. What is Microsoft thinking? Is Redmond promoting piracy?

The idea of providing security and other updates to pirated copies as well as legit copies of Windows might seem crazy, but here's the reasoning, straight from Paul Cooke, director of Windows Client Enterprise Security:

Keeping a machine up to date is one of the first steps in helping ensure that they remain reliable, compatible, and safe from threats when they are online. Some of the most famous incidents of malicious software infection have come after security updates were publicly available from Microsoft - Blaster, Zotob, Conficker and Sasser, just to name a few. Rest assured that we at Microsoft are committed to making sure that security updates are available to all of our users to help ensure a safe online experience for everyone.

Note that Cooke is laying the blame for many recent security problems where it belongs: on users and companies who will not upgrade their software to block such threats. By continuing the recent policy of allowing users of non-genuine Windows to receive security updates, Microsoft is saying, in effect, 'don't blame us if unpatched systems are compromised.'

However, don't think that Redmond's turning a patched eye to either casual piracy or software counterfeiting. Pirated copies of Windows 7 won't be eligible for some of Microsoft's goodies, and Softpedia points out that counterfeit copies of Windows often come with a "free" bonus: malware.


[via maximumpc.com]

A Speedier Digsby IM Client Is On It's Way

photobucketA new private alpha release of Digsby's all-in-one IM application for Windows looks like it's slashing some of the speed and CPU issues known to plague the slick-looking chat and uber-status-and-e-mail-update application, now in beta.

Some back-end work (specifically, an update to Python 2.6 coding language and a move to a new compiler) has reduced the CPU load by 30 percent, Digsby claimed in a blog post. In addition, Digsby did some work on stabilizing AOL IM and Windows Live Messenger (MSN) file transfers.

Other changes include new support for setting your MySpace status, and an option to flash new IM windows by default in the tray, instead of the current behavior that pops them up as they come in. Alpha testers will also be able to go invisible on Google Talk, and have a greater range of emoticons to share.

While most of us won't see these tweaks yet, Digsby die-hards can rest assured that improved performance, lower CPU usage, and more chatting niceties are likely on their way once the alpha testers conclude their bug-bashing.

[via download.cnet.com]

FeedDemon Finally Ads Google Reader Synchronization

feeddemon

FeedDemon has finally added synchronization support for Google Reader. That means you can now read feeds on the desktop with FeedDemon but can continue using Google Reader as your online feed reader.

To enable Google Reader sync in your copy of FeedDemon, head over to the FeedDemon Beta site and download the latest version of the software.

If you already use FeedDemon, you first need to move your RSS feed subscriptions from Newsgator to Google Reader and this can done via Tools | Synchronization Options | Advanced | Convert Now. The conversion will take a couple of minutes to complete and then you will be able to read all FeedDemon feeds inside your online Google Reader account.

[via labnol.org]

Google Links Google Analytics to Adsense

The integration between Google Analytics and Google AdSense is a significant upgrade for AdSense's limited reports. Until now, AdSense didn't offer reports for individual pages and users had to manually create custom channels to track the performance for up to 200 pages.

The AdSense section from Google Analytics includes a lot of new information: the list of pages that bring the most important revenue, the most profitable referrers and you can find even more by creating custom segments.


Google Analytics blog has more details about the integration and the way you can link your AdSense account with Google Analytics.

Replace Gmail's Standard Links with Icons

photobucket

GMail Compactor for Greasemonkey replaces Gmail's standard top-left links: Compose, Inbox, Sent Mail, etc., with clear icons, while also moving the search box underneath, saving left-hand space for links, labels, and other widgets. Unfortunately this Greasemonkey script doesn't always play nice with other Gmail scripts, and certain Gmail Labs functions seem to disable or hinder it, so it will only work for some of you.

[via lifehacker.com]

Free, Cloud-Based Antivirus for Windows from Panda

photobucketPanda has been working on Cloud Antivirus for nearly three years, and it's now available to the public in beta form.

The application aims to leverage the power of the cloud to better and more quickly detect and analyze new threats as they appear - which can be done in as little as six minutes, according to Panda. Called "Collective Intelligence," Panda's system utilizes anonymous data from users running the application and processes about 50,000 new threats each day.

In exchange for your participartion in Cloud, you're given totally free virus protection for your personal computer (sorry, no commercial use). That's a pretty good deal for a tool that is able to provide near-realtime detection and analysis. Temporarily off the 'net? No problem. Cloud maintains a local cache to keep you protected when you're apart from the Collective, Locutus.

The new program reportedly takes up around 50 MB on the hard drive and eats around 17 MB of RAM when in use. That compares well against the industry average that Panda provided of 60 MB, and Bustamante said that they're aiming for 12 MB of RAM when in use.

Panda Cloud Antivirus is for Windows XP and Windows Vista, with planned support for Windows 7 when it's released. Bustamante added that it will stay in beta as it's being accepted by users, although they hope it will leave beta by the end of this summer.

[via cnet.com]

Image Thumbnails Made Easy with RightThumb

RightThumb is a free Windows software which can quickly create thumbnails from your images. It comes with right click context menu integration and allows you to quickly create thumbnail from any image files as it supports lots of graphic formats.

photobucket

To enable context menu integration, run ‘RightThumb.exe’, open the options Window and select “Run in Context Menu box”. This will add ‘Create a Thumbnail’ entry to the right click context menu. You can set default conversion options that allows you to specify the thumbnails dimensions, format and file name postfix as well as well as compression settings and algorithm to use. After setting and saving these options, quickly generate the thumbnail with the right click menu. It supports BMP, JPEG, GIF and PNG formats. Thumbnails can be saved as files or can be directly copied to Clipboard.

Discover Ubuntu Karmic Koala (9.10)

photobucketIt has only been a few days since Ubuntu 9.04 aka the Jaunty Jackalope was released but we're already thinking about the next Ubuntu release: Karmic Koala (9.10).

Following what came with Jaunty, the desktop version of 9.10 will feature even faster boot times. Yes, even faster than 17.5 seconds, plans Mark Shuttleworth. Adopting to what Red Hat always had, the Ubuntu team is plans to incorporate a graphical boot (no more usplash) supported by all video cards. They are also focusing hard on netbook support as well as their netbook edition for low powered netbooks which will now support a larger range of netbooks available in the market.

Ubuntu may make an exception as the team claims that the netbook edition is so built that it would boot in 25 seconds. Now that’s a netbook! For both the desktop and netbook release, the dev team is considering a change from the classic brown shade in the default theme ‘Human’. The brown theme has been there since the beginning and is one thing that people are tired of in Ubuntu. Well, now they can have a new shiny and snappy theme and they can rule the world with it.

Further expanding the cloud computing features that came with Jaunty Jackalope, Ubuntu is now adapting to the Eucalyptus project which will further allow people to create and deploy their own clouds by using simple tools. It will enable webmasters to create an Amazon EC2-style cloud in your own data center, on your own hardware. Mark Shuttleworth notes:

It’s no coincidence that Eucalyptus has just been uploaded to universe and will be part of Jaunty - during the Karmic cycle we expect to make those clouds dance, with dynamically growing and shrinking resource allocations depending on your needs.

Apparently, amongst other features, 9.10 will probably sport a new Gnome version and X.Org server for better hardware support.

Flavors of Ubuntu like Kubuntu and Xubuntu will feature the above though they will also come with their own specific additions like an updated KDE 4.3 for Kubuntu which is gaining popularity these days. We all have our eyes set on the Koala for its ambition to take over OSX in design (and pwn Windows for everything and anything).

You can follow the release cycle for Ubuntu 9.10 Karmic Koala to keep a tab on its progress.

May 14th, 2009 - Alpha 1 release
June 11th, 2009 - Alpha 2 release
July 23th, 2009 - Alpha 3 release
August 13th, 2009 - Alpha 4 release
September 3rd, 2009 - Alpha 5 release
September 17th, 2009 - Alpha 6 release
October 1st, 2009 - Beta release
October 22nd, 2009 - Release Candidate
October 29th, 2009 - Final release of Ubuntu 9.10


The New Cairo-Dock v2, Simply Amazing

I was recently looking for an Avant Window Navigator replacement and tried out most of the docks out there. And then i saw that Cairo Dock, which wasn't near one of the best has a new version only downloadable on it's website (with .deb files for Ubuntu too) and after trying it, i was amazed.

Download it from here (download both Cairo Dock and Plugins!).

You can run the new Cairo Dock in two ways: using OpenGL or Cairo. You will be asked when launching:
cairo-dock

but if you want to start it by default in OpenGL mode, use this:
cairo-dock -o

or use -c for Cairo, though it's best to run it in OpenGL to use all the effects.

The configuration panel looks like the one used in Compiz (Compiz-Config Settings Manager) and everything is customizable:

photobucket


It also comes with a lot of themes who's every aspect is customizable, including applets, effects, system tools and so on. Here is a video with some themes and effects:


If you're into eye-candy, the new Cairo Dock is a must for you!

Note: you obvsiously need Compiz enabled for this to work!

Update: the new final version 2.0.0 of Cairo Dock is here!

Opera Web Browser Turns 15

The Opera web browser may not have the name recognition of more popular software like Firefox, Internet Explorer, or Safari. But you know what it does have? History. The first line of code for the Opera web browser was written 15 years ago today.

Back in 1994, Mozilla was working on something called Netscape, not Firefox. And Microsoft didn't release Internet Explorer 1 until 1995.

Over the last 15 years, Opera has continually added features that were later adopted by other browsers, including tabs, mouse gestures, speed dial bookmarks, and full page zoom.

To celebrate the anniversary, Opera has put together a portal with a comic strip, 15 reasons to try Opera, and a list of innovations that showed up first in the Opera browser.

You might also want to check out Opera.com today for a quick refresher on what the web looked like 15 years ago.

Firefox 3.5 Beta 4 is Now Available for Download

photobucketFirefox 3.5 beta 4 is now available for download, the last beta before the final version of Firefox 3.5 is out.

Private browsing is one of those long-sought features that everyone else has, and although Mozilla has been testing it for a while now, it’s one of the “big” features in the latest beta.

Besides private browsing mode, which lets you choose whether you want Firefox to retain possibly sensitive browsing data with one click, other new features compared to the 3.0.x Firefox branch include:


- Better performance and stability with the new TraceMonkey JavaScript engine.
- ability to provide Location Aware Browsing using web standards for geolocation.
- Support for native JSON, and web worker threads.
- Improvements to the Gecko layout engine, including speculative parsing for faster content rendering.
- Support for new web technologies such as: HTML5

You can download Firefox 3.5 beta 4 for Windows, Mac or Linux here.

If you’re not big on beta testing, you should know that the current stable, 3.0.x branch of Firefox has recently been updated to version 3.0.10, which brings several security and stability issues.


Free Domain and Hosting for 1000 GeoCities Users

Yahoo! Geocities is closing down and webmasters hosting sites on Geocities need to find an alternate free hosting solution soon to move their websites. Dreamhost is offering Geocities users 2 years of free web hosting!

photobucket

What is the deal? Free 2 years unlimited hosting. Free domain name!

What is required? They need to verify you are an existing GeoCities customer. So you need to login to Geocities and create a new web page or edit an existing page and post the text “I’m off to DreamHost!” on it. Since new users cannot sign up to Geocities, only existing users can do that.

What is the promo code ? When signing up for Dreamhost, put the full url to that web page you created with the notice as the promo code and you’ll get a 2 year plan (which would otherwise cost $214.80) totally free!

I just tried this for myself and it worked!

Portable Applications Launcher: CodySafe

photobucketCodySafe is a program launcher for Windows that can be installed to a USB flash drive to give you quick access to any portable applications stored on your drive. In other words, it's a lot like the PortableApps with a Start Menu. But there are a few things that make CodySafe worth checking out, even though it's still in beta.

First, in addition to letting you organize your applications, you can organize documents on your flash drive much the same way you do on a Windows PC, by sorting items into pictures, music, video, and documents, with shortcuts to each on your start menu. Second, CodySafe has a ton of customization options, including:
  • Customize your start menu by arranging items into groups
  • Add programs to an Autorun menu so they will launch whenever you run the CodySafe menu
  • CodySafe Control panel lets you adjust the language, system settings, or scan the disk for errors
  • Set custom command line parameters for each application

You can either install a handful of portable apps from CodySafe's web site, or you can use the application manager in the CodySafe options menu to add any app stored on your flash disk, including programs from PortableApps.com, Pendriveapps, and The Portable Freeware Collection.

CodySafe is a free utility. Future versions will include file, folder, and disk encryption, and a disk backup tool.

[via downloadsquad.com]

Display User Submission Count from Social Media Websites in Google Analytics

photobucket

Social Media Metrics Plugin for Google Anayltics is a Greasemonkey script will retrieve the Digg, Sphinn, Mixx, Reddit, StumbleUpon, Del.icio.us and Yahoo inLinks count of a page (post) and display it to you on the Content Detail report of your Google Analytics console.

Also, the icons are interactive, meaning that if you had zero diggs you could click the digg icon and it will automatically take you to the digg submission page.

This is a really nice addition to Google Analytics and if you often use social media websites such as the ones above, you're going to love this little Greasemonkey script.

Ctrl + Alt + Backspace Disabled in Most Linux Distributions [FIX]

The ctrl-alt-backspace key combination was used to restart X-server and was recently disabled because of a upstream (X.org) design decision:

The Ctrl-Alt-Backspace key combination currently "zaps" (hard-restarts) the X server, and thus loses any unsaved data in applications, etc. This key combination is also largely undocumented, so users (probably ex-Windows users) may press this key combination without expecting data loss. This spec proposes to follow upstream's lead and disable this key combination by default in order to prevent this usability issue from occurring in normal installs.


There are two ways of still using the Ctrl Alt Backspace behavior:

1. Press AltGR + SysRQ + K instead (AltGR is the RIGHT ALT button and SysRQ is labelled "Print Screen" most of the times, and remeber to press and hold the keys in the in the right sequence, eg. starting with ALtGR, and ending with the K(ill) key).

2. I don't know if this works on other distributions, but on Ubuntu, you can edit you xorg.conf (/etc/X11/xorg.conf) and add the DonZap "False" value. That will make Ctrl + Alt + Backspace work again.

So to do this, edit the xorg.conf file by adding this:
Section "ServerFlags"
Option "DontZap" "false"
EndSection

Google AdWords Keywords Tool Changes: Local vs Global Search

photobucket

Google rolled out a number of improvements to the Keyword Tool interface. The previous options have been replaced with two columns, one for local search volume for the previous month and one for global search volume:

The newly added Local Search Volume column provides data “specific to your targeted country and language as well as your selection from the Match Type drop-down”, whilst the global monthly search volume provides “traffic in all countries and languages and is specific to your selection from the Match Type drop-down menu”.

It should be added that there still seem to be some issues with the feedback of the system itself not only with the accuracy of the figures which in my opinion has always been an issue with the tool, but more specifically with the fact that in may cases the tool appeared to bring greater figures back for the local search results than that of the global search volumes.

[via marketingpilgrim.com]

Free Online Glass Button Generator

photobucket

Glassy Buttons is a great online button generator. Why so great? Well, because you can customize every aspect of the button: starting with button and text color, rollover text and background colors, you can specify your own images or custom font and so on.

After you finish building your button, you can download a zip file containing all the images and a "readme.txt" file where you will find all the attributes of your new button. For instance, this is the content of my custom glassy button readme.txt:
button text: WebUpd8
primary color: 339900
gradient color: 00cc33
width (pixels): 100
height (pixels): 24
corner radius (pixels): 15
text height (points): 12
text color: ffffff
background color: white
font name: Helmet bold-ital
rollover primary color: 33cc99
rollover gradient color: 6666ff
rollover text color: 000000
quality: 4
image location: none
image height (pixels): 12
image name:
image foreground color determination: auto
image foreground color: 000000
image transparent color determination: auto
image transparent color: ffffff
url: http://www.glassybuttons.com/buttonmill/glassy.php?button_text=WebUpd8&color=339900&grcolor=00cc33&width=100&height=24&radius=15&theight=12&tcolor=ffffff&bkcolor=white&fname=Helmet+bold-ital&rcolor=33cc99&rgrcolor=6666ff&rtcolor=000000&imglocate=none&imgheight=12&imgname=&imgfore=auto&imgforecolor=000000&imgtran=auto&imgtrancolor=ffffff&quality=4&fromhere=1

Multi protocol Instant Messaging Client for Windows: Instan-t

photobucketInstan-t messenger is like Adium for Mac, it allows you to add all your instant messaging account under one so you don’t have to open multiple chat software. Instan-t messenger supports MSN, Gtalk, Yahoo! Messenger, ICQ and AOL and you can even conduct a video chat across different IM clients. It supports multiple ways to display your contact list, tabs in message window skins and there’s also a web version if you prefer not to install any software.

Instan-t messenger has no ads and it’s free to download.

Last Week's Top Posts (Week 17, 2009)

Split APE and FLAC Files in Ubuntu and Add Tags by Cue File

Did you ever downloaded a single APE or FLAC file consisting of multiple songs? If so, it's quite annoying to try and listen to only one song. But you can split the files into multiple songs exactly like in the cue file (each song's start and end time are saved in the cue file, so we'll know where to cut the big file).

What you need to split APE and FLAC files by Cue file

1. You need "cuebreakpoints" (part of "cuetools") and "shnsplit" (which is part of the "shntool"), so open a terminal and paste this:
sudo apt-get install cuetools shntool

2.

a) For APE files, you need to install the "Mac" package. This isn't in any repositories, but you can download a deb file from here.

b) For FLAC and WAV you need to install "flac" and "wavpack", so paste this in a terminal:
sudo apt-get install flac wavpack

Shnsplit requires a list of break-points with which to split an audio file. Conveniently, cuebreakpoints (part of cuetools) prints the break-points from a cue or toc file in a format that can be used by shnsplit.

Splitting the APE and FLAC files

Now, to split an APE file into multiple FLAC files (without the need to type the name of the .ape and .flac files), use the terminal to navigate to the folder where the APE file is located and type this in the terminal:
cuebreakpoints *.cue | shnsplit -o flac *.ape ;

To convert a large FLAC file intro multiple FLAC files (songs), the same as above, navigate using the terminal to the folder where the FLAC file is located and run this in the terminal:
cuebreakpoints *.cue | shnsplit -o flac *.flac ;

As you can see, the output file format is specified via the "-o" option. If you don’t specify an output format your split files will be in shntool’s default format (i.e., wave files, "wav").

After the splitting is complete, you will find in that folder some files named: split-track01.flac, split-track02.flac ... split-trackNN.flac. Each of that files is a song from the APE file. You can specify your own prefix (instead of "split-track") via the "-a" option.

Adding tags to the FLAC files so we'll see the song details (name, artist, etc) in our audio player

You will need "cuetag" for this which is part of the "cuetools" but since you already installed it (see previous seps), all you have to do is open the terminal, navigate to the folder where you just splitted some APE or FLAC files and type this:
cuetag *.cue split-track*.flac ;

(if you didn't change the file's name from split-trackNN.flac). All the split-track*.flac files will have tags in just a few seconds.

You can also conver an single .ape file to a single .flac file. To convert all .ape files in a directory to flac using shntool:
shntool conv -o flac *.ape

2 Really Cool MacOSX-like Dock Menus for Windows

1. Rocket Dock

photobucket

Rocket Dock is a Mac OS X style launcher application for Windows. It looks smoothly blended as well as animated. Though there are other products of its type such as MobyDock, Object Dock etc I have found it to be the best so far.

You can easily drop your icons on it so that they can be accessed easily. One of its best features is its Taskbar support through which your minimized windows appear as icons on the Dock. In Windows Vista, it even gives real time Window Previews. It is highly customisable. You can select its position, layering, animation options, it comes with a lot of skins which are cool. The animations and transitions are very smooth. It is a very light weight and can even run well on slow computers. It is also compatible with MobyDock, Object Dock, RK Launcher etc.


And yes, it is FREE. A great tool to increase your productivity. Have you tried software’s like these? If so , which one do you prefer ? Share your thoughts in comments.

Download Rocket Dock

2. sTabLauncer

photobucket

I like to mention about all the Application Launchers that i come across because such programs can always make our work easier and increase productivity. RocketDock is a great utility to have if there are a few programs that you use everyday but if the program list is large, RocketDock can get filled quickly. sTabLauncher is an application launcher that offers something different by letting you create tabs in the dock. You can even group your programs this way and can even have a lot of programs in the dock.

Each tab can be populated with as many icons as you like. You can dock it along the top or bottom of the screen or anywhere you want along the edges. The launcher is highly customizable. You can modify each tab individually and select its colour, skin, font, size etc. The tabs can be arranged by dragging and dropping. The tab separators can also be customized by adding images or text. It also has Mini Browser which lets you browse folders. You can even drag and drop files over an application and the file will open with it. This is quite similar to the open with feature in Windows. You can even configure the transparency of the Launcher and make it blend with your Desktop.

This is a nice launcher and a good one for those who are not Satisfied with RocketDock or ObjectDock. It runs on Windows 2000/XP/Vista and requires .Net Framework 2.0.

Download sTabLauncher


[via whoismadhur.com]

Add "Subscribe By Instant Messenger" to Your Website

Using the Notifixio gadget, you can display an option to you website's visitors to subscribe by instant messenger. It supports GTalk, AIM, Yahoo Messenger, Windows Live, Jabber, ICQ and email. That means each person that subscribes will receive updates consisting of new blog posts through a windows in their instant messaging client.

To allow visitors to subscribe by IM, all you have to do is add this gadget to your website:
<script src="http://s3.amazonaws.com/notifixious_assets/notifixious_widget.js"></script>
Because I didn't like the way the gadget looks, i modified it using CSS:
#new_account_form input {
width:135px!important;
}
#notifixious_signature {
display : none!important;
visibility: hidden!important;
}
#notifixious_instructions {
margin: 0 5px 10px 5px!important;
}
#notifixious_widget feed {
display : none!important;
visibility: hidden!important;
}

Before:

photobucket

After:

photobucket

Don't worry about it's width, it will automatically fit in your sidebar.

4 Ways to Create Bootable Live USB Drives (For Windows, Linux and Mac OS X)

Below you'll find 4 tools along with instructions on creating bootable live USB drives under Linux (Ubuntu), Windows and Mac OS X.

1. Using UNetbootin (for Windows and Linux)


photobucketUNetbootin allows you to create bootable Live USB drives for a variety of Linux distributions from Windows or Linux, without requiring you to burn a CD. You can either let it download one of the many distributions supported out-of-the-box for you, or supply your own Linux .iso file if you've already downloaded one or your preferred distribution isn't on the list.

UNetbootin has built-in support for automatically downloading and loading the following distributions: Ubuntu, Debian, Fedora, PCLinuxOS, Linux Mint, Sabayon Linux, Gentoo, MEPIS, openSUSE, Zenwalk, Slax, Dreamlinux, Arch Linux, Elive, CentOS, Damn Small Linux, Mandriva, SliTaz, FaunOS, Puppy Linux, FreeBSD, gNewSense, Frugalware Linux, NetBSD but can work with others too.


UNetbootin can also be used to load various system utilities, including:
  • Parted Magic, a partition manager that can resize, repair, backup, and restore partitions.
  • Super Grub Disk, a boot utility that can restore and repair overwritten and misconfigured GRUB installs or directly boot various operating systems
  • Backtrack, a utility used for network analysis and penetration testing.
  • Ophcrack, a utility which can recover Windows passwords.
  • NTPasswd, a utility which can reset Windows passwords and edit the registry.
  • Gujin, a graphical bootloader that can also be used to boot various operating systems and media.
  • Smart Boot Manager (SBM), which can boot off CD-ROM and floppy drives on computers with a faulty BIOS.
  • FreeDOS, which can run BIOS flash and other legacy DOS utilities.


Installation & Screenshots


  1. If using Windows, run the file, select a distribution, floppy/hard disk image, or kernel/initrd to load, select a target drive (USB Drive or Hard Disk), then reboot once done.


  2. If using Linux, make the file executable (using either the command chmod +x ./unetbootin-linux, or going to Properties->Permissions and checking "Execute"), then start the application, you will be prompted for your password to grant the application administrative rights, then the main dialog will appear, where you select a distribution and install target (USB Drive or Hard Disk), then reboot when prompted.

    screenshot

    screenshot

  3. After rebooting, if you created a Live USB drive by selecting "USB Drive" as your install target, press the appropriate button (usually F1, F2, F12, ESC, or backspace) while your computer is starting up to get to your BIOS boot menu and select USB drive as the startup target; otherwise if there's no boot selection option, go to the BIOS setup menu and change the startup order to boot USB by default. Otherwise, if you did a "frugal install" by selecting "Hard Disk" as your install target, select the UNetbootin entry from the Windows Boot Menu as the system boots up.


To create a Live USB using UNetbootin, download an ISO file, select it under UNetbootin's "diskimage" option, and specify your target USB disk under "Drive:". After pressing OK, wait as the ISO is extracted to your USB drive; once done, you will have a bootable Linux Mint Live USB drive.

Requirements


1 GB or larger USB drive, formatted as Fat32 (most USB drives come formatted as FAT32 by default, but if you need to format it, on Windows, go to My Computer->right click your USB drive->format, or on Linux, use GParted or another partition manager)

Supported operating systems: Windows 2000 and above OR a modern Linux distribution

Additional dependencies (Linux Only): You will need the packages syslinux and p7zip-full installed (no dependencies on Windows)

2. Using Win32 Image Writer (Windows only)


Graphical Interface


win32imagewriter.jpg
  1. Download the desired .img file
  2. Insert your flash media
  3. Note the drive letter assigned to your flash media
  4. Start Disk Imager
  5. Select the downloaded file and target device, and click "Write"
  6. Remove your flash media when the operation is complete

Command Line alternative


  1. Download the desired .img file
  2. Download flashnul from http://shounen.ru/soft/flashnul
  3. Attach your USB drive
  4. Run flashnul -p
  5. Note the physical device number for the USB drive
  6. Run flashnul -L \path\to\downloaded.img
  7. Answer "yes" if the selected destination device is correct
  8. Remove your USB drive when the command completes

3. Using usb-imagewriter (Ubuntu Only)


Graphical Interface


usb-imagewriter.png
  1. Download the desired .img file
  2. Install the usb-imagewriter package
    • If your release does not include this, download it from Oliver's PPA
  3. Open Applications -> Accessories -> Image Writer
  4. Insert your flash media
  5. Select the downloaded file and flash device, and click "Write to Device"
  6. Remove your device when the operation is complete

Command Line alternative


  1. Download the desired .img file
  2. Open a terminal and insert your flash media
  3. Look at the output of dmesg | tail -20 to determine the device node assigned to your flash media (e.g. /dev/sdb)
  4. Run sudo umount /dev/device/node
  5. Run sudo dd if=/path/to/downloaded.img of=/dev/device/node bs=1M
  6. Remove your flash media when the command completes

Update: Ubuntu now includes "Startup disk creator". You can access it via System > Administration > Startup Disk Creator and it's a very easy to use tool. Simply enter your memory stick into the USB drive, then open Startup Disk Creator and select "Format" (the USB stick needs to be formatted first), then select the ISO image you want to write on the USB memory stick and click "Make startup disk". That's it.


4. Using Diskutil (Mac OS X only)


  1. Download the desired .img file
  2. Open a Terminal (under Utilities)
  3. Run diskutil list to get the current list of devices
  4. Insert your flash media
  5. Run diskutil list again and determine the device node assigned to your flash media (e.g. /dev/disk2)
  6. Run diskutil unmountDisk /dev/diskN
  7. Execute sudo dd if=/path/to/downloaded.img of=/dev/diskN bs=1m
  8. Run diskutil eject /dev/diskN and remove your flash media when the command completes


New Twitter Desktop Client: Statuzer

photobucketStatuzer is a new multi-platform Twitter Client running through Air.

Features

  • fully customisable color scheme
  • MP3 Playing from song.ly and tra.kz
  • Jamendo music search (free and legal)
  • Displays twitpic images in tweet
  • Youtube Thumbs
  • Twitter search moving Trends
  • Hashtags
  • Fast display filter
  • contacts groups
  • followable Twitter searches
  • notifications
  • URLs preview
  • image/webcam upload
  • image/webcam upload to twitter profile image
  • multi-account
  • search filters
  • short URLs (Twitter API)
  • encode/decode MinUrl and TinyUrl

Url Shortening Firefox Addon with Google Analytics Support

photobucketSnip-n-Tag is a Firefox addon to easily shorten URLs, plus add Google Analytics tracking tags. Great for measuring traffic from Twitter. Snip-n-Tag currently supports four URL shortening services: tinyurl, tr.im, cli.gs, and is.gd. More services will be supported in the future, like bit.ly.

Three Google Analytics campaign tags are supported currently: medium, source and campaign.

We already covered a bookmarklet for adding Google Analytics tracking to short urls and also see some integrated stats with cli.gs but in case you would like to use some other short url service or just use a full-featured Firefox addon for this job, then give Snip-n-Tag a try.

Yahoo Messenger 9 'Status' Tweak

On Friday, Yahoo let it be known they added a small tweak to Yahoo Messenger 9 for Windows.

When the latest version of Yahoo's chat application launched, it broadcast as secondary status messages certain activities within the Yahoo network, like refreshing your avatar. Now the service has expanded to record your doings on roughly twenty networks outside of Yahoo--like Twitter, Last.fm, YouTube, Pandora, and Yelp--as well as tracking your whereabouts more thoroughly within Yahoo's network, like the sports, movies, and shopping silos.

photobucket

Sharing is optional, of course, but to get it, you'll need to make sure you've got a Yahoo profile set up. Then click 'Updates', then 'Manage my Updates' to pick share sites within Yahoo. To set up status-sharing from outside services, you'll need to add your login name via the 'Share More' tab. Set-up was fast and easy, especially with the search field that lets you enter a common username to find multiple accounts that share your log-in.

Is it notable? Not really. It's a small tweak that might take some work off the hands of obsessive status-updaters, but given Yahoo CEO Carol Bartz's vow to whip Yahoo's engineering corps into shape, this isn't the kind of 'news' we expect to see going forward.

[via download.cnet.com]

Ubuntu Boot Chart: Make a Graph with Your Computer's Boot Time

Boot Chart for LInux is a simple way to automatically make a chart consisting of the applications your computer runs at boot, with the time it takes to load each app. Here is an example:

photobucket

As you can see, my computer's boot time was 30 seconds. I can use that chart to see which applications take a lot of time to load and remove them if they aren't important, etc. If my computer's performance would have been like the 17,5 seconds of Matt Cutt's computer, I could have used it to brag, but I can't do it with my 30 seconds boot time :)

To install bootchart in Ubuntu, run this in a terminal:
sudo apt-get install bootchart


After you computer boots, you will find the boot charts in this folder:
/var/log/bootchart

Best Twitter Greasemonkey Script: Troy's Twitter Script

Troy's Twitter Script (created by Troy Thompson) is a Greasemonkey script for Twitter that does everything (and we mean everything).

After installing the script and visiting Twitter, we found so many useful tweaks to almost every Twitter view that it was almost overwhelming. Here's what it does broken down into three main functionalities:


  • Enhancement: Links in tweets are automatically expanded and replaced with the target page title if available. Media like YouTube videos and Twitpic images are included in-line. Hashtags are converted to Twitter search links. Auto-pagination is enabled as you get to the bottom of the current page. The 'definitions' area is hidden. Last but not least, replies are included underneath the latest tweet, indented and smaller (great for those of you still using the default "include all @replies" in your settings!)
  • Functionality: Hovering over a tweet shows default actions like star (save), reply, and retweet. Long URLs are automatically shortened if the tweet you are typing in exceeds the length limit. Twitter names get autocomplete launched by typing an @ in a tweet. Twitter bio text gets inserted into following/followers list.
  • New Hotness: A new search field added to Twitter sidebar. Any searches performed from sidebar get saved and added to the sidebar (removable). A tiny smilie face is added to the Twitter icon of those people who are following you. When viewing a specific Twitter user, their social graph is inserted in the bio area. Notes can be added to any user's Twitter page. Local time is added if the user's time zone is in their profile. Map to user's location is inserted if location or geo coordinates are in their profile. Finally, the most awesome addition: Groups support in your followers/following tabs, you can add people to groups that show up in the Twitter sidebar.

Troy's Twitter script, in our opinion, is crazy awesome. If you find yourself in a memory crunch and prefer not to use a standalone Twitter application, and use Firefox, this script is a must-have. In fact, it's too bad that Greasemonkey scripts really only work well in Firefox, because it sure would be great to have all these features in every browser out there. To that end, you can try using Greasemetal (covered here) for Chrome, or GreaseKit for Safari on Mac OSX.

Update: There's a modified version of Troy's script that adds a link in the user profile to the Mailana user analysis app, Top Twitter Friends. This feature should be rolled into the main script in the next version.

[via RRW]

Wolfram Alpha Search Engine Getting A Public Preview On Tuesday

When it was first unveiled in March, Wolfram Alpha, a new type of search engine created by computer scientist Stephen Wolfram, got a lot of buzz. Naturally, some people threw out the “Google killer” title — but it seems to be a different beast, as it’s all about knowledge search. That is to say, you ask a question, and you get an answer — with Google, you ask a question and you get a link to a bunch of documents. That may sound a bit bland, and simplistic, but the select few who have seen it, seem to think it works really well and could be a game changer.

The rest of us won’t know for sure until May, when it’s scheduled to launch. But if you want to catch a glimpse of how it will work, the Berkman Center for Internet & Society at Harvard is hosting a webcast on Tuesday of an event with Wolfram and Jonathan Zittrain, a law professor at Harvard. The sold-out event will be streamed live on the web at 3PM EST this coming Tuesday on this page


You should also try Yauba, a new and very interesting search engine.

[via techcrunch.com]

Convert Your ext3 File System to ext4 (in Ubuntu Jaunty 9.04) [HOWTO]

If you are one of those people and you don't want to miss out using the new ext4 file system, there is a way to convert your existing ext3 file system to ext4.

Please note that converting-to/using ext4 is by no means necessary, you are not missing out if you are using ext3 (hell, ext2 is still widely in use). So only do this if you like to hack and get your hands dirty.

Before starting, take a look at the known issues with ext4!


Step one:
Upgrade to Jaunty. You now have a working jaunty install running the ext3 file system.

Step two:
Make a backup of all your (important) data. You can use fwbackups or any other app.


Step three:
Boot from a (jaunty) live-cd and run the following code (in this example the partition to convert is on /dev/sda1) to convert the partition:
sudo bashtune2fs -O extents,uninit_bg,dir_index /dev/sda1e2fsck -pf /dev/sda1

Step four:
Mount the partition and change the type of the converted partition in fstab:
sudo bashmount -t ext4 /dev/sda1 /mntnano /mnt/etc/fstab

change "ext3" to "ext4" like in the example below:
# /dev/sda1UUID=XXXXXXXXXXXXXXXXXXXXXXXXXX /               ext3    relatime,errors=remount-ro 0       1

change it to:
# /dev/sda1UUID=XXXXXXXXXXXXXXXXXXXXXXXXXX /               ext4    relatime,errors=remount-ro 0       1

and save the changes.

Step five:
This step might be optional but when I upgraded from Intrepid to Jaunty the upgrade process did not install/update the new grub stage. So if you don't run either of the following code examples you might get an (fatal) error 13 when booting the machine.
Use this code to refresh grub when you do not have a separate /boot partition (in this example the root partition is sda1)
sudo bashmount /dev/sda1 /mntgrub-install /dev/sda --root-directory=/mnt --recheck

Use this code to refresh grub when you do have a separate /boot partition (in this example the /boot partition is sda1)
sudo bashmkdir /mnt/bootmount /dev/sda1 /mnt/bootgrub-install /dev/sda --root-directory=/mnt --recheck

That's it, after you reboot you you will be running from an ext4 file system.
As a side note, all the files that where present before the conversion will not benefit from the conversion as they were written to disk using ext3 technology. Only newly created or overwritten files will be using the true ext4 technology (so now, using update-manager will be extra beneficial). As ext3 and ext4 are compatible with each other having files written to disk in ext3 mode on your ext4 file system do not impose any risks (and most if not all ext3 sectors could eventually disappear even without defragging).

There is currently a online-defragging tool in development (e4defrag) which should be available with the next kernel release.

Credits: whoop user @ ubuntuforums.org

Eye-Candy Disk Space Usage Analyzer

SpaceSniffer is a free program which can analyze your hard disk and present you with a dynamic disk map which tells you which folders and files are taking too much space. It gives you a general idea about the disk usage and you can spot your files and folders which are taking too much space. If you have a large disk, then it makes it easy for you to spot your folders that may be containing too much junk data.

photobucket

The program requires no installation. On running the exe file, the program will ask you to select a disk partition that you want to analyze. Select the drive and it will scan the drive present a Disk Map to you in real time. If you want, you can even open the files and folder or even delete files/folder from there itself and the Disk map will be automatically updated to reflect the changes. Files that are shown can also be filtered and you can customize the chart colours according to your taste. You can also configure it to show free space and unknown space.

The program is a freeware and very small in size. The interface is pretty good with some fancy animations. It works on Windows 2000/XP/2003/Vista.

Multiple Software Installation on a Fresh New Windows Install

photobucket

Smart Installer Pack incorporates a handful of software usually installed on new computers, reinstalled operating systems, etc.

So, SIP was made just to eliminate all the searching around for nothing, waiting, downloading (which can take up a lot of time) and only then installing.

Now, when you need to install all the applications every computer need - on a fresh Windows installation - all you have to do is download this Smart Installer Pack and click on the preferred icons - you can choose which software to install.

It includes a host of apps like Firefox, Chrome, OpenOffice, Winamp, Skype, Daemon Tools, Picasa, Thunderbird, Adobe Reader and Flash, WinRar, Rocket Dock, CCleaner, and many more. Everything downloads in a single file, so you won't be cluttering up your drive with a bunch of separate installers.

There is a little draw-back: the installers are interactive, not silent, so you'll have to click through manually.

YouTube Real-Time Sharing Invitations - Comment to Get an Invitation


Thanks to http://stadt-bremerhaven.de, i was invited to use the new YouTube Real-Time Sharing, a reall cool new YouTube option only available through invitations.

So i now have 25 invitations. To receive one, comment on this article by entering your youtube username.

Please note that i have to add you as a friend and you have to accept, otherwise it will not work!

YouTube Upload Application

photobucketFree YouTube Uploader is a free Windows application which can upload video files directly to YouTube without the need of YouTube's web interface.

You can add all the video settings from within the application, such as title, description, tags and category. One of the good features of the program is that it includes a video trimmer that lets you optimize the size and quality of the video easily.

If you upload videos to YouTube regularly, you should give this app a try!

Ubuntu Jaunty 9.04 Intel Graphic Drivers - How to Enable Desktop Effects (Compiz)

In the new Ubuntu 9.04 Jaunty Jackalope, Intel graphic (video) drivers 965 (x3000 or x3100) are blacklisted so you cannot run Compiz thus your desktop effects cannot be enabled. There is a way to enable desktop effects, though this is not recommended because the drivers were blacklisted due to an error in xserver-xorg-video-intel and they will be whitelisted when the bug fill be fixed.

But if you want to use Compiz anyway, all you have to do is type this in a terminal:
mkdir -p ~/.config/compiz/ && echo SKIP_CHECKS=yes >> ~/.config/compiz/compiz-manager


Update 05 May 2009: It seems that some Intel cards now work in Ubuntu Jaunty, after the latest updates.


Update 09 May 2009: You may also want to check out the Ubuntu graphic drivers repository.

Ubuntu Jaunty Doesn't Show When Updates Are Available Fix

Ubuntu 9.04 Jaunty Jackalope doesn't show the update icon in the system tray when there are updates available. This is because the update system was changed in Ubuntu Jaunty:

Ubuntu 9.04 introduces a change to the handling of package updates, launching update-manager directly instead of displaying a notification icon in the GNOME panel. Users will still be notified of security updates on a daily basis, but for updates that are not security-related, users will only be prompted once a week.


If you want to use the old update manager behaviour, open a terminal and paste this:
gconftool -s --type bool /apps/update-notifier/auto_launch false

Color Separation Effects with Tintii

photobucket

Tintii Photo Filter is a free and open source software which allows you to apply color separation effects to your images with just a few clicks. This saves you a lot of time without having to install or use some other software like PhotoShop.

The program will automatically separate the color profile of the loaded image into a handful of major hues. You can then select which one do you want to keep and which one you want to suppress.

tintii is free and open source software, available on both Linux and Windows operating systems.

You will need to purchase a key to activate the optional Photoshop plug-in, only available on Windows.


[via]

Yahoo! Closes GeoCities

geocitiesYahoo! is slowly killing off some of its service that I kind of forgot it had. In January, the company announced it would be pulling the plug on Yahoo! Briefcase, an online file storage site that was state of the art 10 years ago when it offered 30MB of web based storage, but which hasn't really been updated since. Today Yahoo! is hammering the nail in the coffin of GeoCities, a web site building service that hasn't been updated in nearly as long.

Yahoo! has already stopped accepting new account registrations, but existing GeoCities pages won't be pulled down until later this year.

The company hasn't offered a simple path for migrating your data yet, but Yahoo! is suggesting users upgrades to paid Yahoo! web hosting accounts. There are no plans to offer a free web hosting service in the future.

Upload Any Image on the Web to Your Flickr Account with a Click

photobucket


Send To Flickr Bookmarklet is just a Javascript bookmarklet which allows you to easily upload images found while browsing to your Flickr account with a single click.

All you have to do is copy the code below and add a new bookmark pointing to it (as if it was an URL):
javascript:t='';for(var n=0;n<document.images.length;n++){t+='<a href=/ onclick=\'document.f.url.value=document.images['+n+'].src;document.f.submit();return false;\'><img border=0 src='+document.images[n].src+'></a><br>'};if(t!=''){document.write('\<p\>Click an image to add it to your photostream\</p\>\<form name=f action=http://www.flickr.com/tools/sendto.gne method=get\>\<input type=hidden name=url\>\</form\>'+t+'');void(document.close())}else{alert('No images!')}

Click it when you want to upload images from a web page, to Flickr.


[via]

Drag and Drop Your Windows Taskbar Buttons to Rearrange Them using Taskbar Shuffle


Taskbar Shuffle is a free and simple program which lets you drag and drop Taskbar buttons in order to arrange them. If you like to arrange the taskbar buttons and system tray icons in a particular order according to your taste, then you should give this a try.

On running the program, it will quietly sit in the system tray icons. You can enable, disable or modify the settings by right clicking on the system tray icon. When this is enabled, you can simple rearrange your taskbar button or system tray or icons by dragging and dropping them according to your taste. You can also configure it to allows system tray icon shuffling on pressing a hotkey with the mouse. You can even use the middle mouse button to close a system tray button if you enable it from settings. You can even reorder tasks in the grouped button pop up menu in the same way.


If you run several applications at once, you might find this quite useful. I wonder why Windows didn’t;t have it in the first place. It is a freeware and works with Windows. It is very small and is also portable.

Features:

  • Reorder your taskbar buttons by dragging and dropping them
  • Reorder your tray icons in the same way
  • Reorder tasks in a grouped button's popup menu in the same way
  • Middle-click to close programs on your taskbar
  • Tweak taskbar button grouping

Ubuntu 9.04 Jaunty Jackalope Has Been Released


New features include:

1) Gnome 2.26 desktop environment, which includes the following new features:
a) brasero, an all-in-one CD burning application.
b) Improved multi-monitor handling.
2) X.Org server 1.6, which supports several new video cards, as well as ATI-specific performance improvements including EXA acceleration by default, 2D support for R6xx/R7xx, 3D support for R5xx cards, along with an updated -fglrx proprietary driver for R6xx/R7xx 3D support.
3) New notification style and preferences.
4) Boot performance is "significantly improved".
5) Linux kernel 2.6.28-11.37, which is based on 2.6.28.8.
6) Ext4 file system support.
7) Server edition includes support for cloud computing via Eucalyptus, an open source technology which is included in Ubuntu as a technology preview, enables you to use your own servers to deploy, experiment and test your own private cloud that matches the Amazon EC2 API.
8) Turn-key mail servers with the dovecot-postfix package, which supports SMTP, POP3 and IMAP with TLS and SASL.


Ubuntu has published upgrade instructions for those wishing to migrate from 8.10 (the previous release).
"To upgrade from Ubuntu 8.10 on a desktop system, press Alt+F2 and type in update-manager -d into the command box. Update Manager should open up and tell you: New distribution release '9.04' is available. Click Upgrade and follow the on-screen instructions.
"To upgrade from Ubuntu 8.10 on a server system: install the update-manager-core package if it is not already installed; edit /etc/update-manager/release-upgrades and set Prompt=normal; launch the upgrade tool with the command sudo do-release-upgrade; and follow the on-screen instructions."

Google's Matt Cutts shows us how fast JJ can load using an Intel X25-E Etreme Single-Level Cell (SLC) SDD. The X25-E has a 75 microsecond latency, and up to 250 MB/s read speeds, and 170 MB/s write speeds. From notebook power-on to Firefox launched and running Google, it was 23.0 seconds, with about 5.5 seconds being the notebook's BIOS. At 18 seconds it had a mouse pointer and at around 22 to 23 seconds Firefox was loaded with the Google page.

Even though it does not show up on Ubuntu.com home page, you can already download Ubuntu 9.04 See Ubuntu's 9.04 download page and of course, the download mirrors.

If you are looking for screenshots, see here (nothing has changes mostly).

Conky-like Desktop Info Application With Html Support (gtk-desktop-info) [Ubuntu / Linux]


ubuntu gtk-desktop-info

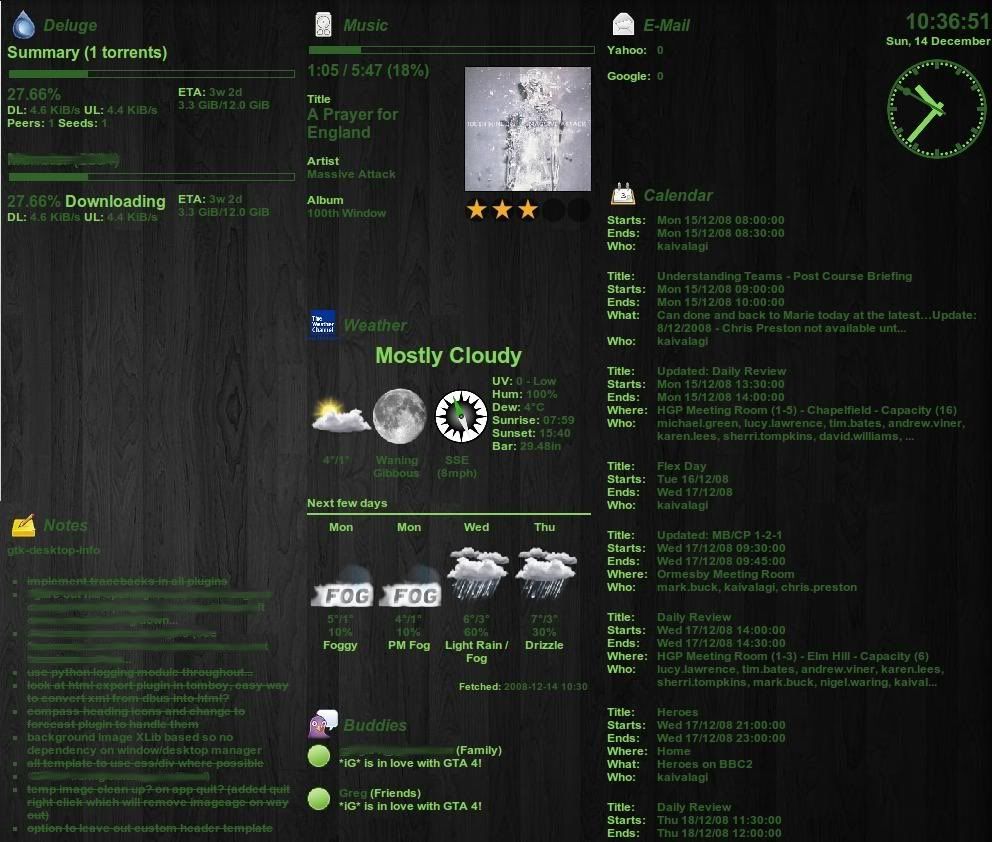
gtk-desktop-info is a python tool to display various pieces of information directly on the desktop, using plugins for html rendering, with html templates and css style sheets for formatting.

The application has been created off the back of existing python scripts used with Conky. The reason for it's creation is a simple one, Conky is great but formatting can suck sometimes and html seemed the obvious choice of formatting giving the user the ability to construct output in a variety of styles based on understood techniques.

General points to note about the app are:
  • Very lightweight and low cpu usage
  • Creates cropped images of the background wallpaper and uses them for the generated html background, effectively making the window transparent.
  • Utilises webkit html rendering engine and supports images, javascript and flash as you would expect in the browser
  • Ability to customise any output within the boundaries of what can be done with html, and as it's html there are plenty of editors out there which can help with design
  • All output content is scrollable, so the window size remains unchanged. Using the scroll wheel on a mouse will alway you to see the extra content
  • Variety of plugins available and you also have the ability to use external scripts for rendering content too


Plugins

All the plugins have come from my conky tinkering of the past, and have been adapted to output html based information, including weather/moon/wind icons for forecasts, and coverart for music. Plugins are defined using the –plugin option of the main application.

Below is a summary of each plugin.
  • “deluge” – this plugin provides a breakdown of bit torrent information, when bit torrents are managed by Deluge. It can provide detailed and/or summary info.
  • “email” - this plugin provides email account information, a count of unread emails and optionally details of the sender and subject of the emails.
  • “exaile” - this plugin displays Exaile based song information, cover art, rating, progress etc
  • “feedparser” - this plugin provides rss/atom feed information
  • “forecast” - this plugin provides weather forecast information from weather.com for a given location. It includes weather, moon and wind images, detailing the weather.
  • “googlecalendar” - this plugin provides Google Calendar event information.
  • “null” - this plugin provides a means to use html, javascript and flash only content. By default is displays a javascript clock.
  • “pidgin” - this plugin provides pidgin buddy information, telling you who is online and what their status is.
  • “rhythmbox” - this plugin displays Rhythmbox based song information, cover art, rating, progress etc
  • “shell” - this plugin provides a means to execute scripts and commands from within a template. Whatever can be done on the command line can be done here too.
  • “tomboy” - this plugin provides information on Tomboy based notes, keeping most formatting from the notes intact in the output.

Note: The shell plugin will provide the equivalent functional to that used with exec/execi calls in Conky. The big difference however, is that it sources all the results from execs inside [] from within a template file, meaning that formatting of command line results is much simpler and neater. A lyrics scripts would work nicely in it for example

Current Limitations

Compiz wallpaper settings are not supported yet, however gnome, xfce, kde3, and kde4 are.

If tiling or simple background colours are used, the application will no handle these well.

I am attempting to find a better way to handle system wallpaper, independently from the window manager type, so that the only thing this application will be dependant on is gtk, webkit and python libraries. However this may be some time off. If you have issues with wallpapers and the fake transparency is not working, I suggest you use the –wallpaper option, as described in the guide.


Basic Install

Method 1: Using apt

1) Create the necessary list file for access to the repository by running one of these:

Jaunty Jackalope:
sudo wget -q http://www.kaivalagi.com/ubuntu/ppa/m-buck-gtk-desktop-info-jaunty.list -O /etc/apt/sources.list.d/m-buck-gtk-desktop-info-jaunty.list

Intrepid Ibex:
sudo wget -q http://www.kaivalagi.com/ubuntu/ppa/m-buck-gtk-desktop-info-intrepid.list -O /etc/apt/sources.list.d/m-buck-gtk-desktop-info-intrepid.list

2) Add the gtk-desktop-info repository public key to your apt setup by running this:
wget -q http://www.kaivalagi.com/ubuntu/ppa/m-buck-gtk-desktop-info-key.gpg -O- | sudo apt-key add -

3) Now that is done simply run the following to install
sudo apt-get update && sudo apt-get install gtk-desktop-info

Method 2: Using tar.gz file

Only go this route if you know what you're doing, you are not likely to get much help if you get stuck!

1) Go to https://launchpad.net/~m-buck/+archive/gtk-desktop-info and download the latest tar.gz files for gtk-desktop-info and gtk-desktop-info-data packages.

2) Extract all the contents of the tar.gz files to an appropriate folder of your choice, the default location is /usr/share/gtk-desktop-info

3) Copy the gtk-desktop-info and gtk-desktop-info.guide script files to /usr/bin, edit them to point to the folder you extracted everything to, and make them executable

There are several dependencies for the app to run, these are:
  • Python Google GData API
  • Python PyWebKitGtk libraries
  • Python Imaging library
  • Python Xlib Libraries
Unless you are using a non-Debian based OS I don't suggest this. Users of Debian/Ubuntu flavour OS's should ideally use the first method as all dependencies will be handled. You will not receive updates using this method either.

Any further details on setup are orientated around the deb package based install, so may differ from what you choose your setup to be, if done using the tarball.


Usage Help

Refer to the attached guide for a detailed explanation of the application, along with information on the command line usage etc. The guide is also available within the install, it can be opened by running the following (evince is expected to be installed):
gtk-desktop-info.guide

You can also see the available options by running this in a terminal:
gtk-desktop-info -h

Development History

Development history going forwards can be seen here https://code.launchpad.net/~m-buck/+...k-desktop-info

And details on the packages available from me can be found here https://launchpad.net/~m-buck#ppas

Here is a more detailed guide in case there is something you do not understend in the above guide:


Credit for this goes to kaivalagi user @ ubuntuforums.org.

Tweetmeme Also Goes Real-Time

photobucketIt seems like everyone is going real-time today. After YouTube, now Tweetmeme, a memetracker that tracks popular retweets on Twitter, just launched a real-time version of its service that displays tweets that are currently in heavy rotation on the popular microblogging service. In order to filter this constant stream of messages, Tweetmeme users can choose to only see messages that have been retweeted at least twice, though the default setting is for five retweets and can go up to twenty.

Seeing every tweet that has only been retweeted twice is not for the feint of heart as the stream scrolls by extremely fast, but once you filter it down to at least five retweets the stream becomes quite manageable. Tweetmeme's Founder, Nick Halstead, tells us that Tweetmeme uses the same polling technology as Friendfeed, and that the company plans to implement these real-time updates on other parts of the site as well.

Channels

In addition to these real-time streams, Tweetmeme is also focusing on providing channels about specific topics including this one for Earth Day, for example. Thanks to this, it might soon be a lot easier to filter out the noise during a big conference, for example, where it is usually impossible to keep distinguishing between high-value tweets and random invitations for lunch.

Sadly, these channels don't yet feature the new live streams, which is really a shame.

[via RRW]