1. Using UNetbootin (for Windows and Linux)
 UNetbootin allows you to create bootable Live USB drives for a variety of Linux distributions from Windows or Linux, without requiring you to burn a CD. You can either let it download one of the many distributions supported out-of-the-box for you, or supply your own Linux .iso file if you've already downloaded one or your preferred distribution isn't on the list.
UNetbootin has built-in support for automatically downloading and loading the following distributions: Ubuntu, Debian, Fedora, PCLinuxOS, Linux Mint, Sabayon Linux, Gentoo, MEPIS, openSUSE, Zenwalk, Slax, Dreamlinux, Arch Linux, Elive, CentOS, Damn Small Linux, Mandriva, SliTaz, FaunOS, Puppy Linux, FreeBSD, gNewSense, Frugalware Linux, NetBSD but can work with others too.
UNetbootin can also be used to load various system utilities, including:
- Parted Magic, a partition manager that can resize, repair, backup, and restore partitions.
- Super Grub Disk, a boot utility that can restore and repair overwritten and misconfigured GRUB installs or directly boot various operating systems
- Backtrack, a utility used for network analysis and penetration testing.
- Ophcrack, a utility which can recover Windows passwords.
- NTPasswd, a utility which can reset Windows passwords and edit the registry.
- Gujin, a graphical bootloader that can also be used to boot various operating systems and media.
- Smart Boot Manager (SBM), which can boot off CD-ROM and floppy drives on computers with a faulty BIOS.
- FreeDOS, which can run BIOS flash and other legacy DOS utilities.
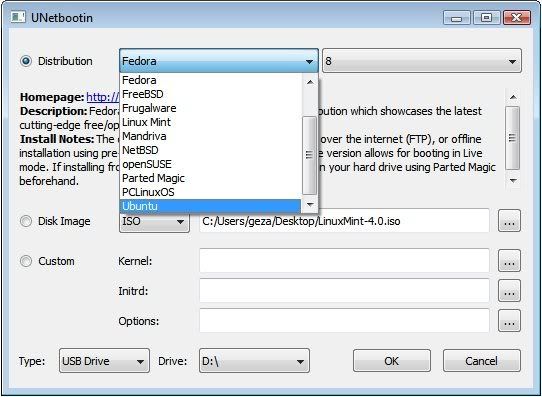
Installation & Screenshots
- If using Windows, run the file, select a distribution, floppy/hard disk image, or kernel/initrd to load, select a target drive (USB Drive or Hard Disk), then reboot once done.
- If using Linux, make the file executable (using either the command
chmod +x ./unetbootin-linux, or going to Properties->Permissions and checking "Execute"), then start the application, you will be prompted for your password to grant the application administrative rights, then the main dialog will appear, where you select a distribution and install target (USB Drive or Hard Disk), then reboot when prompted.
- After rebooting, if you created a Live USB drive by selecting "USB Drive" as your install target, press the appropriate button (usually F1, F2, F12, ESC, or backspace) while your computer is starting up to get to your BIOS boot menu and select USB drive as the startup target; otherwise if there's no boot selection option, go to the BIOS setup menu and change the startup order to boot USB by default. Otherwise, if you did a "frugal install" by selecting "Hard Disk" as your install target, select the UNetbootin entry from the Windows Boot Menu as the system boots up.
To create a Live USB using UNetbootin, download an ISO file, select it under UNetbootin's "diskimage" option, and specify your target USB disk under "Drive:". After pressing OK, wait as the ISO is extracted to your USB drive; once done, you will have a bootable Linux Mint Live USB drive.
Requirements
1 GB or larger USB drive, formatted as Fat32 (most USB drives come formatted as FAT32 by default, but if you need to format it, on Windows, go to My Computer->right click your USB drive->format, or on Linux, use GParted or another partition manager)
Supported operating systems: Windows 2000 and above OR a modern Linux distribution
Additional dependencies (Linux Only): You will need the packages syslinux and p7zip-full installed (no dependencies on Windows)

Command Line alternative

Command Line alternative
Update: Ubuntu now includes "Startup disk creator". You can access it via System > Administration > Startup Disk Creator and it's a very easy to use tool. Simply enter your memory stick into the USB drive, then open Startup Disk Creator and select "Format" (the USB stick needs to be formatted first), then select the ISO image you want to write on the USB memory stick and click "Make startup disk". That's it.
Supported operating systems: Windows 2000 and above OR a modern Linux distribution
Additional dependencies (Linux Only): You will need the packages syslinux and p7zip-full installed (no dependencies on Windows)
2. Using Win32 Image Writer (Windows only)
Graphical Interface
- Download the desired .img file
- Download Disk Imager from https://launchpad.net/win32-image-writer/+download
- Insert your flash media
- Note the drive letter assigned to your flash media
- Start Disk Imager
- Select the downloaded file and target device, and click "Write"
- Remove your flash media when the operation is complete
Command Line alternative
- Download the desired .img file
- Download flashnul from http://shounen.ru/soft/flashnul
- Attach your USB drive
- Run flashnul -p
- Note the physical device number for the USB drive
- Run flashnul
-L \path\to\downloaded.img - Answer "yes" if the selected destination device is correct
- Remove your USB drive when the command completes
3. Using usb-imagewriter (Ubuntu Only)
Graphical Interface
- Download the desired .img file
- Install the usb-imagewriter package
- If your release does not include this, download it from Oliver's PPA
- Open Applications -> Accessories -> Image Writer
- Insert your flash media
- Select the downloaded file and flash device, and click "Write to Device"
- Remove your device when the operation is complete
Command Line alternative
- Download the desired .img file
- Open a terminal and insert your flash media
- Look at the output of dmesg | tail -20 to determine the device node assigned to your flash media (e.g. /dev/sdb)
- Run sudo umount /dev/device/node
- Run sudo dd if=/path/to/downloaded.img of=/dev/device/node bs=1M
- Remove your flash media when the command completes
Update: Ubuntu now includes "Startup disk creator". You can access it via System > Administration > Startup Disk Creator and it's a very easy to use tool. Simply enter your memory stick into the USB drive, then open Startup Disk Creator and select "Format" (the USB stick needs to be formatted first), then select the ISO image you want to write on the USB memory stick and click "Make startup disk". That's it.
4. Using Diskutil (Mac OS X only)
- Download the desired .img file
- Open a Terminal (under Utilities)
- Run diskutil list to get the current list of devices
- Insert your flash media
- Run diskutil list again and determine the device node assigned to your flash media (e.g. /dev/disk2)
- Run diskutil unmountDisk /dev/diskN
- Execute sudo dd if=/path/to/downloaded.img of=/dev/diskN bs=1m
- Run diskutil eject /dev/diskN and remove your flash media when the command completes
