Below you'll find 2 tools that make it easy to use free OpenVPN servers from VPN Gate in Linux.
In case you're not familiar with VPN Gate, this is project that offers free VPN servers that are ran by volunteers who use SoftEther. It was designed with the Great Firewall of China in Mind and is sponsored by the University of Tsukuba, Japan.
It's important to note that free VPNs are insecure, and they shouldn't be used for sensitive / important stuff!
VPNGate With Proxy
VPNGate With Proxy is a VPN Gate client for Linux. Among its features are:
- allows connecting to free OpenVPN servers at VPN Gate directly or through proxy;
- adds DNS to fix DNS leak;
- automatically filters out dead VPN servers;
- can execute user defined script after vpn_tunnel is established or broken;
- multiple interfaces: two command line interfaces (a lightweight interface aimed to run on a server, and a terminal interface with a better UI, colors, and easier to use) as well as an AppIndicator;
- displays VPN server country, ping, speed, up time, log policy, score, protocol and port in the command line interfaces.
According to its developer, the application has been tested on Ubuntu, Raspbian and Fedora, and may not work with other Linux distributions.
To run VPNGate With Proxy, you'll need Python 2.7.x, python-requests, openvpn, resolvconf, python-urwid 1.3+ (only if you want to use the advanced terminal user interface, called "tui"), wmctrl and realpath.
For the AppIndicator you'll also need gir1.2-appindicator3-0.1, gir1.2-notify-0.7 and python-gobject.
To install these packages in Ubuntu, use the following commands:
sudo apt install python-requests openvpn resolvconf python-urwid wmctrl realpath gir1.2-appindicator3-0.1 gir1.2-notify-0.7 python-gobject gitNext, clone the VPNGate With Proxy GitHub repository and run the application (with the advanced terminal user interface) using the commands below:
git clone https://github.com/Dragon2fly/vpngate-with-proxy.git
cd vpngate-with-proxy
./run tui
On older systems, if python-urwid version 1.3 is not available, VPNGate With Proxy will automatically install it via python-pip.
The application GitHub page provides instructions for how to clone the repository if you're behind a proxy. You can also download the repository as an archive.
The first time you run VPNGate With Proxy, it will run the initial configuration, which includes proxy configuration (if you don't use a proxy to connect to the Internet, simply press ENTER), etc.:
Once you're done with the initial configuration, the application will download a list of OpenVPN servers from VPN Gate - to connect to a VPN, enter its number and press ENTER:
You can sort the VPN list by score (default), ping, speed or uptime. To do this, press F5 and select the sort option.
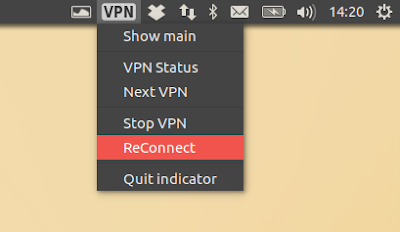
The VPNGate With Proxy AppIndicator should start automatically when running the application. Using it, you can easily stop the VPN, reconnect, choose the next VPN, or show the VPN status:
To see if the VPN is working, you can check your IP by visiting VPN Gate (or any of the many websites that offer this service).
For more information about VPNGate With Proxy, see its GitHub page.
autovpn
autovpn is a small and simple command line tool written in Go, which allows connecting to a random free VPN. Under the hood, autovpn uses OpenVPN to connect to free VPN servers from VPN Gate.
To install and use autovpn, you'll need to install golang-go, openvpn (autovpn depends on it) and git (to clone the autovpn GitHub repository). In Debian, Ubuntu or Linux Mint, you can install these packages using the following command:
sudo apt install golang-go openvpn gitNext, clone the autovpn GitHub repository and compile it:
git clone https://github.com/adtac/autovpn
cd autovpn
go build autovpn.go
And finally, install the generated executable - using the command below, the autovpn executable is installed in /usr/local/bin/:
sudo install autovpn /usr/local/bin/autovpn is extremely easy to use - all you have to do is run it and it will automatically connect you to a VPN. By default (without specifying a country code), it connects to a random US server:
autovpnThat's it, in a few seconds you should be connected to a random free US VPN server.
If you want to use a VPN from another country, add the country code, like this (the command below is an example to connect to a free VPN server from Japan):
autovpn JPNot all country codes will work, since autovpn relies on the VPN Gate iPhone API, which returns around 100 VPN servers, and the country you want to use a VPN from may or may not be in this server list.
To see if the VPN is working, you can check your IP by visiting VPN Gate (or any of the many websites that offer this service).


