Not so long ago, Blogger introduced the custom search box which was only available for blogger in draft, to all.
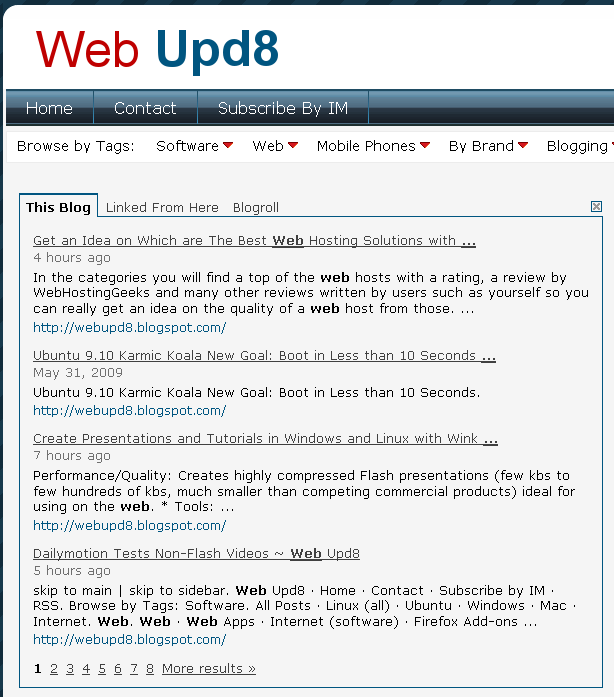
This is how a search performed on your blog will look like:
This is how a search performed on your blog will look like:
And here is how the search box looks like:
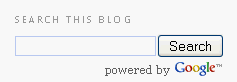
Quite ugly if you ask me... but it can be styled to fit you blog's CSS and also remove the image (i'm talking about the search box, not the tabbed results). Here is how:
1. Don't add the Search box from the "add a gadget" in the Layout options. If you did this, remove it.
2. Go to your Layout > Edit HTML and check the "Expand Widget Templates" option.
3. In the place where you want the search box to be displayed, paste this:
And this is the style for the div that contains the search:
Which makes the searhc box float to the right with the margins you see. Obviously you can change all this.
Also, I deleted the title "Search this blog" and added only "Search" which you can edit the way you want. Then I deleted the image and made both the search box and text appear on the same line.
You can see this new search in action on my test blog.
1. Don't add the Search box from the "add a gadget" in the Layout options. If you did this, remove it.
2. Go to your Layout > Edit HTML and check the "Expand Widget Templates" option.
3. In the place where you want the search box to be displayed, paste this:
<div class='searchf'><b:section class='sidebar' id='searcheee' preferred='yes' showaddelement='yes'>
<b:widget id='CustomSearch12' locked='false' title='Search This Blog' type='CustomSearch'>
<b:includable id='main'>
 <!-- only display title if it's non-empty -->
 <b:if cond='data:title == ""'>
   <h2 class='title'><data:title/></h2>
 </b:if>

 <div class='widget-content' style='width:100%'>
   <div expr:id='data:widget.instanceId + "_form"'>
     <span class='cse-status'><data:loadingMsg/></span>
   </div>
 </div>

 <!-- override gsearch.css -->
 <style type='text/css'>
   #uds-searchControl .gs-result .gs-title,
   #uds-searchControl .gs-result .gs-title *,
   #uds-searchControl .gsc-results .gsc-trailing-more-results,
   #uds-searchControl .gsc-results .gsc-trailing-more-results * {
     color:<data:linkColor/>;
   }

   #uds-searchControl .gs-result .gs-title a:visited,
   #uds-searchControl .gs-result .gs-title a:visited * {
     color:<data:visitedLinkColor/>;
   }

   #uds-searchControl .gs-relativePublishedDate,
   #uds-searchControl .gs-publishedDate {
     color: <data:dateColor/>;
   }

   #uds-searchControl .gs-result a.gs-visibleUrl,
   #uds-searchControl .gs-result .gs-visibleUrl {
     color: <data:urlColor/>;
   }

   #uds-searchControl .gsc-results {
     border-color: <data:borderColor/>;
     background-color: <data:backgroundColor/>;
   }

   #uds-searchControl .gsc-tabhActive {
     border-color: <data:borderColor/>;
     border-top-color: <data:activeBorderColor/>;
     background-color: <data:backgroundColor/>;
     color: <data:textColor/>;
   }

   #uds-searchControl .gsc-tabhInactive {
     border-color: <data:borderColor/>;
     background-color: transparent;
     color: <data:linkColor/>;
   }

   #uds-searchClearResults {
     border-color: <data:borderColor/>;
   }

   #uds-searchClearResults:hover {
     border-color: <data:activeBorderColor/>;
   }

   #uds-searchControl .gsc-cursor-page {
     color: <data:linkColor/>;
   }

   #uds-searchControl .gsc-cursor-current-page {
     color: <data:textColor/>;
   }
     .gsc-branding-img-noclear, .gsc-branding-text, .gsc-search-button {
     display:none!important; visibility: hidden!important;
   }
 </style>

 <b:include name='quickedit'/>
</b:includable>
</b:widget>
</b:section></div><div class='ssss'>Search:</div>
And this is the style for the div that contains the search:
.searchf {
margin-right:3px;
float:right;
margin-top:5px;
}
Which makes the searhc box float to the right with the margins you see. Obviously you can change all this.
Also, I deleted the title "Search this blog" and added only "Search" which you can edit the way you want. Then I deleted the image and made both the search box and text appear on the same line.
You can see this new search in action on my test blog.
